> ## Documentation Index
> Fetch the complete documentation index at: https://octanist.com/docs/llms.txt
> Use this file to discover all available pages before exploring further.
# GTM DataLayer
> Use GTM to send lead events from a website dataLayer to Octanist.
This guide is for the GTM DataLayer setup. It is still supported and is useful when your website already pushes lead data into the dataLayer. If you only want to install the Octanist pixel through GTM, use [GTM Pixel](/docs/incoming-integrations/gtm-pixel).
The GTM DataLayer endpoint returns Octanist's internal lead UUID, but does not accept an external lead ID. If you need to submit an order number, quotation number, or another customer-owned identifier, use [form mapping](/docs/incoming-integrations/form-mapping) or the authenticated [Create Lead API](/docs/api-reference/endpoint/create-lead).
## Table of Contents
1. [Setup Video](#setup-video)
2. [Getting the Octanist ID](#1-getting-the-octanist-id)
3. [Prepare the Website](#2-prepare-the-website)
4. [Set Up Google Tag Manager](#3-set-up-google-tag-manager)
1. [Create a Workspace](#31-create-a-workspace)
2. [Create the DataLayer Variables](#32-create-the-datalayer-variables-it-is-easier-than-you-think)
3. [Create the Custom Event submit\_lead\_form](#33-create-the-custom-event-submit_lead_form)
4. [Add the Template](#34-add-the-template)
5. [Configure the Tag](#35-configure-the-tag)
6. [Test and Publish](#36-test-and-publish)
5. [Optional](#4-optional)
1. [Marketing Campaign Data](#41-marketing-campaign-data)
2. [Consent](#42-consent)
3. [Custom Domain Delivery](#43-custom-domain-delivery)
6. [Octanist - Outgoing Integrations](#5-octanist-outgoing-integrations)
***
## Setup Video
Need help setting up Octanist? Watch our setup video. For the most up-to-date implementation guide, please follow the written guide below.
## 1. Getting the Octanist ID
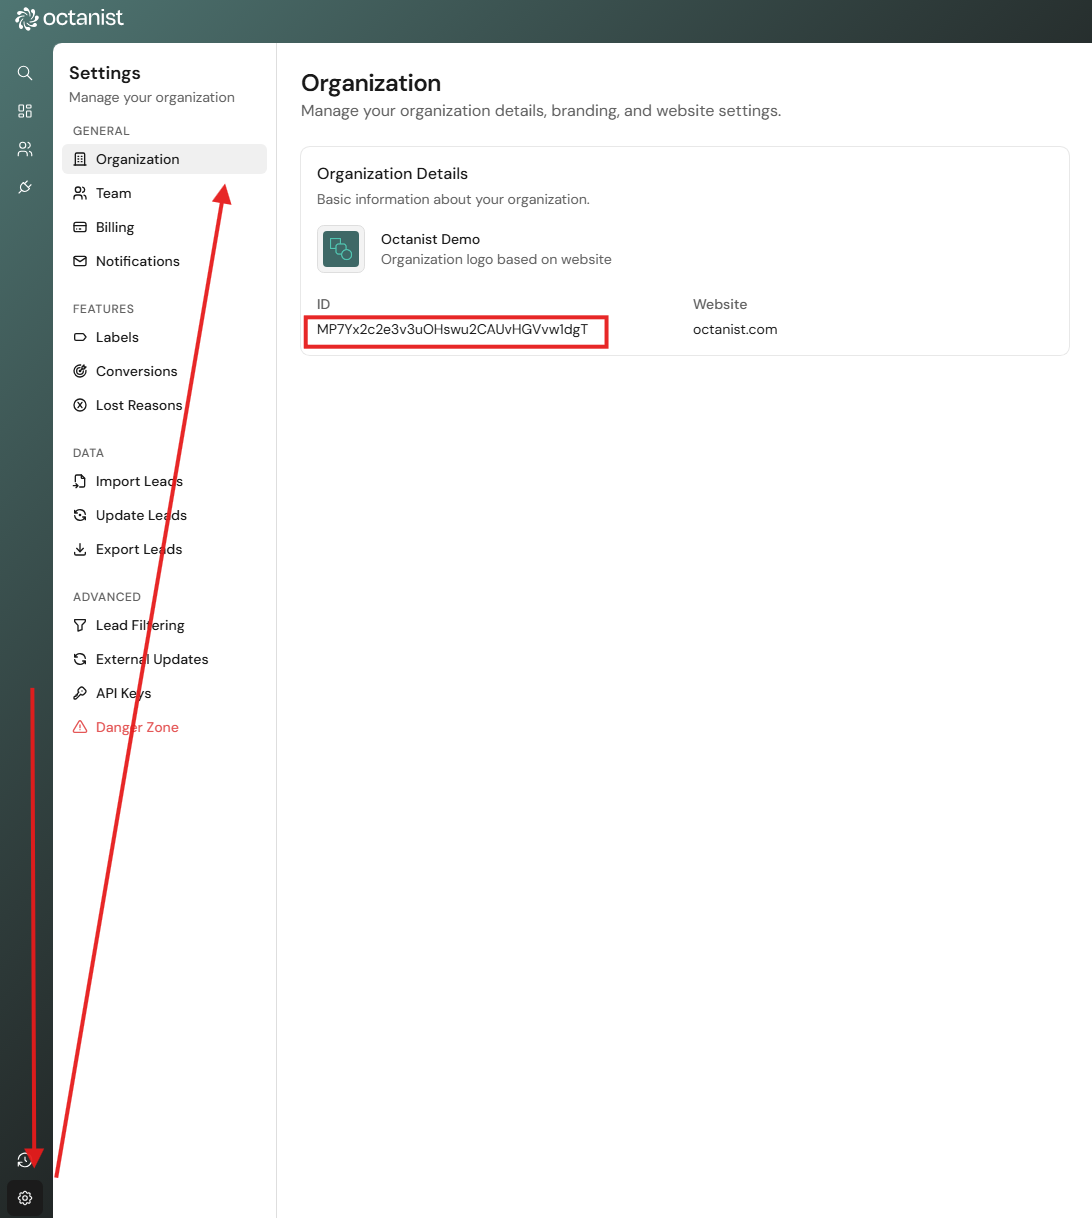
* Navigate within Octanist to **Settings > Organization**.
* Within your Organization Settings, copy the Octanist ID. Save it for now because we will need it later.
***
## 2. Prepare the Website (+ email to web developer)
* To send lead data to Octanist, the data must be available on the website. We highly recommend using a [**dataLayer**](https://developers.google.com/tag-platform/tag-manager/datalayer) **push event** to ensure consistency and robust measurement.
* Ensure the lead data is placed in the dataLayer. Ask a developer to implement the following code to activate the dataLayer push after a lead form is submitted:
Dear \[WEBDEVELOPER],
We are currently in the process of setting up [Octanist](https://octanist.com/), a tool that helps us determine the true value of the leads coming through our website. To make this work and send data effectively to Octanist, we need to ensure the data is pushed to the [dataLayer](https://developers.google.com/tag-platform/tag-manager/datalayer). This will allow us to capture the necessary information using Google Tag Manager and send it to Octanist. Therefore, we kindly request adding the following code to the backend of our forms:
```html theme={null}
```
Please let us know once this is in place and if you need any assistance.
Kind regards, \[YOUR DETAILS]
***
## 3. Set Up Google Tag Manager
### 3.1 Create a Workspace
* Click on **Default Workspace**.
* Click on the **+ sign** in the upper right corner to **create a new workspace**.
* Give the workspace a name (e.g., ***Octanist Setup***).
* Click on **Save**.
### 3.2 Create the DataLayer Variables (it is easier than you think)
*If your developer implemented the dataLayer exactly as described in step 2, follow these steps.*
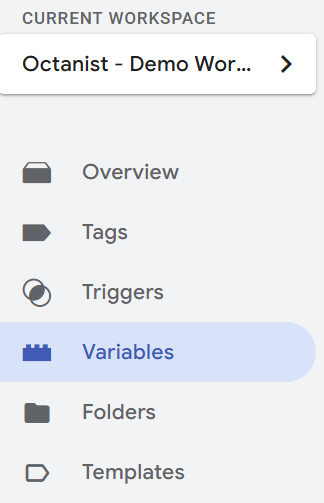
* Go to the **Variables** tab.
* Navigate to **User-Defined Variables**. Click **New** on the right-hand side to create a new variable.
* For email, give it the name: **DLV - user\_data.email**
* Click on **Variable Configuration**.
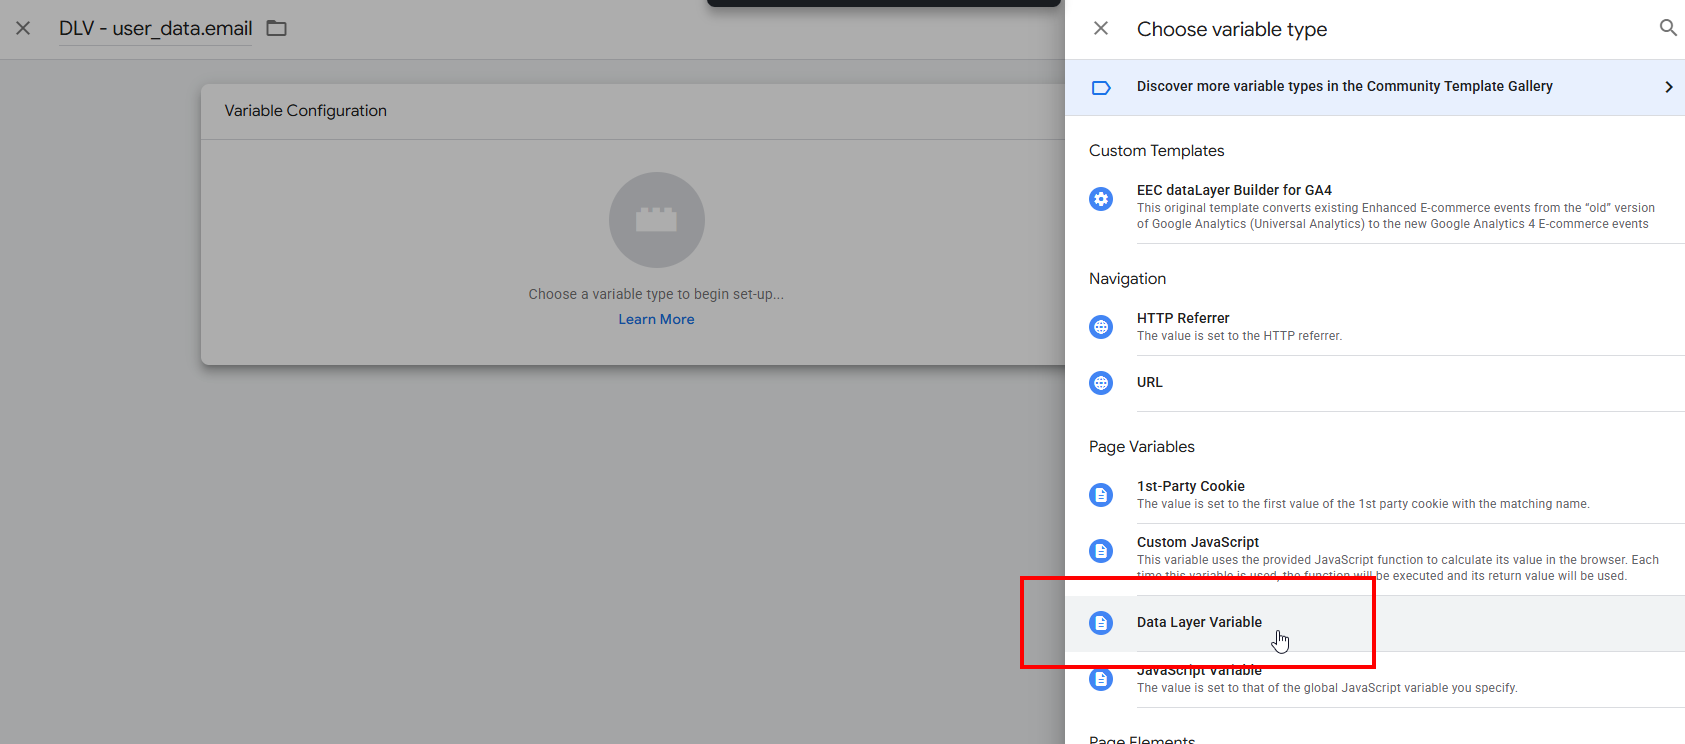
* Click on **Data Layer Variable** (under Page Variables).
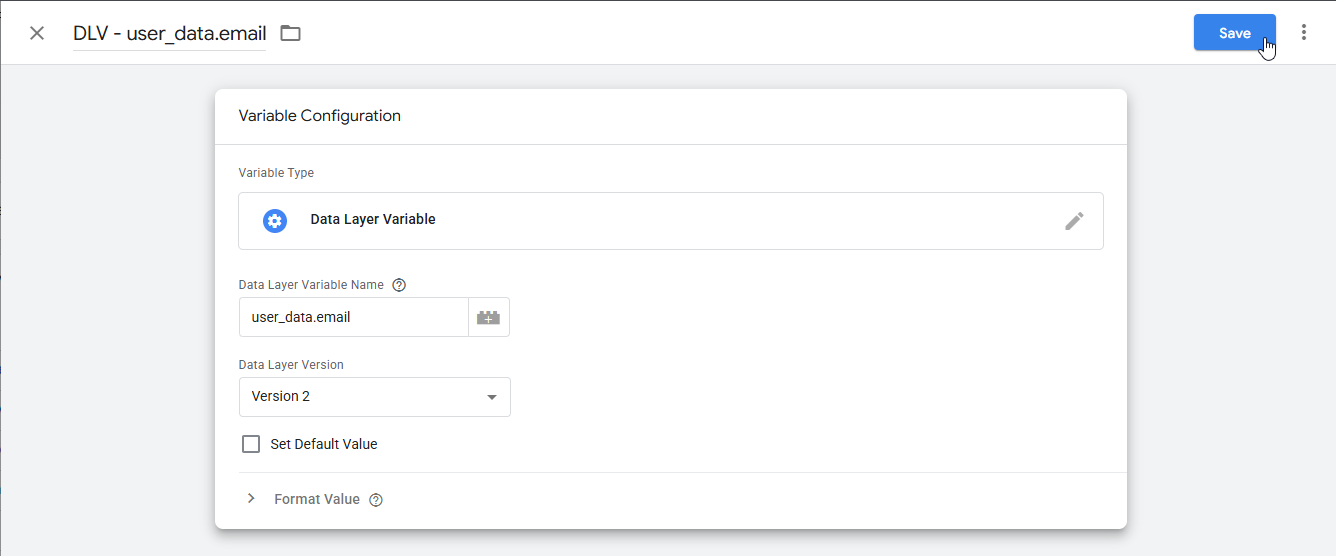
* Fill in Data Layer Variable Name: **user\_data.email**
* Click on **Save**.
* **Repeat these steps** to create variables for **Name** and **Phone\_number** as well:
* DLV - user\_data.name
* Data Layer Variable Name: **user\_data.name**
* DLV - user\_data.phone\_number
* Data Layer Variable Name: **user\_data.phone\_number**
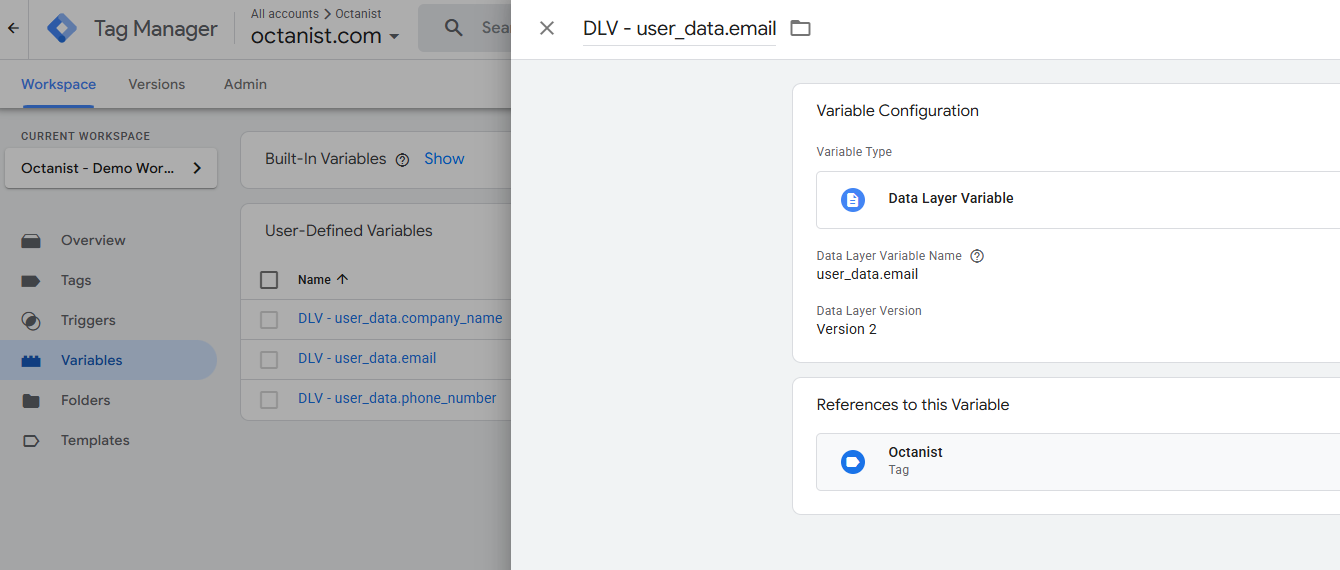
* The setup should look like this:
### 3.3 Create the Custom Event *submit\_lead\_form*
* Go to **Triggers** on the left-hand side.
* Click on **New**.
* Give it the name: **Event - submit\_lead\_form**
* Click on **Trigger Configuration** and select **Custom Event** (under Other).
* Fill in the "Event name" field with **submit\_lead\_form**.
* Leave the remaining settings as they are and click on **Save**.
### 3.4 Add the Template
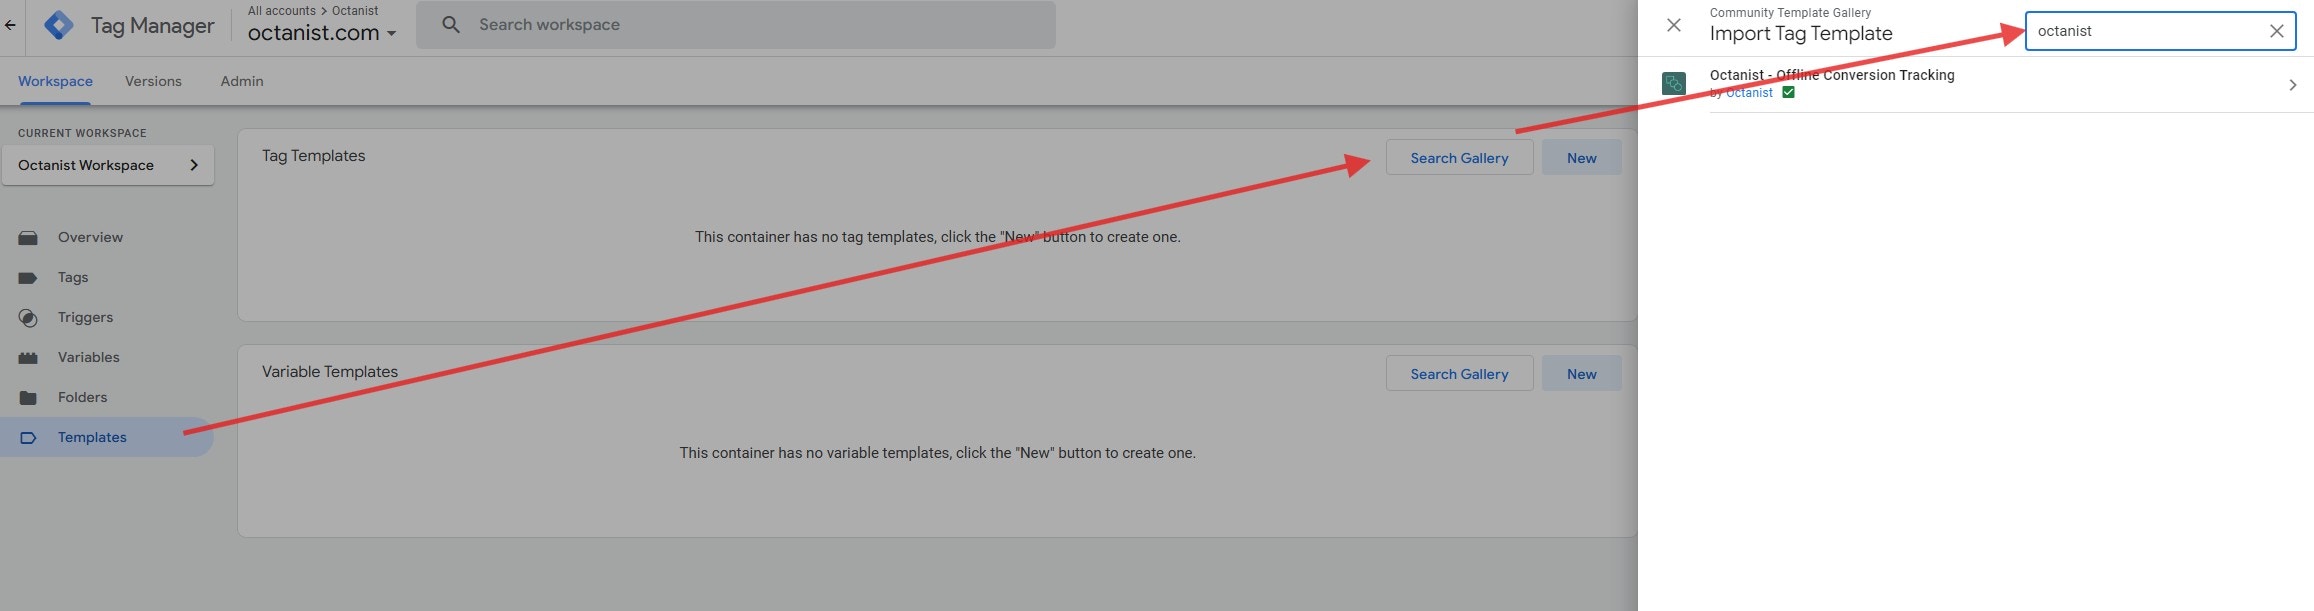
* Go to **Templates > Tag Templates > Search Gallery**.
* Search for "Octanist" and click on our Google-Verified Tag Template.
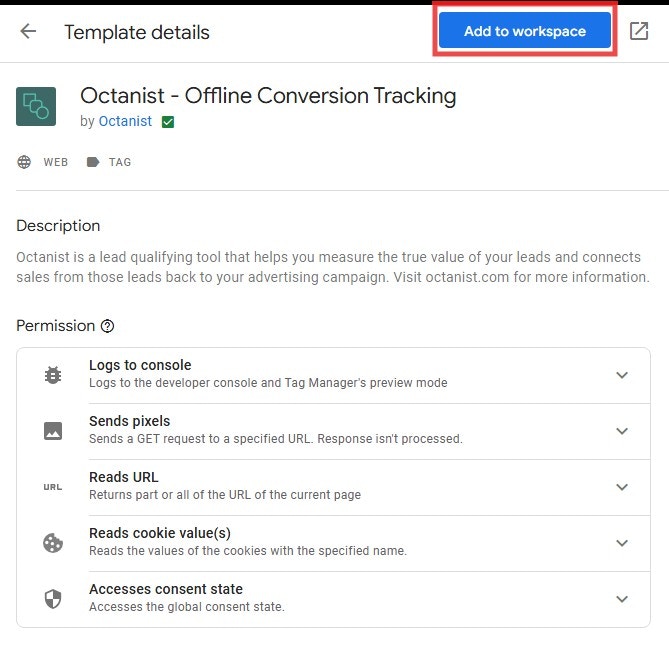
* Click the **Add to Workspace** button.
* Confirm and click **Add**.
### 3.5 Configure the Tag
* Go to **Tags**.
* Click **New** to create a new tag and give it the name: **Octanist - Offline Conversion Tracking**.
* Click on **Tag Configuration** and select the tag type: **Octanist - Offline Conversion Tracking** (GALLERY), under "Custom".
* Enter your **Octanist ID**. *You saved this at the end of step 1.*
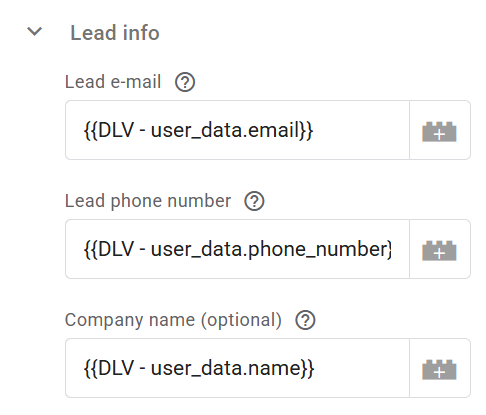
* Click the **add variable** icons and add the Data Layer variables configured in step 3.2. It should look like this:
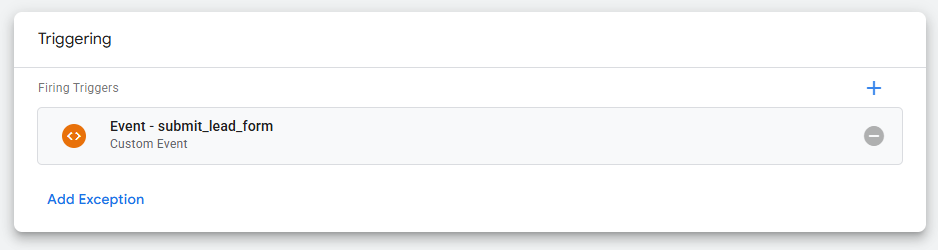
* Set the trigger. Click on **Triggering** below the Tag Configuration.
* Select the **Custom Event** for the **submit\_lead\_form** trigger created in step 3.3.
* Leave the remaining settings as they are. Click **Save** in the upper right corner.
### 3.6 Test and Publish
* **Test** the form using GTM debug mode.
* Click **Preview** in the upper right corner (next to the Submit button).
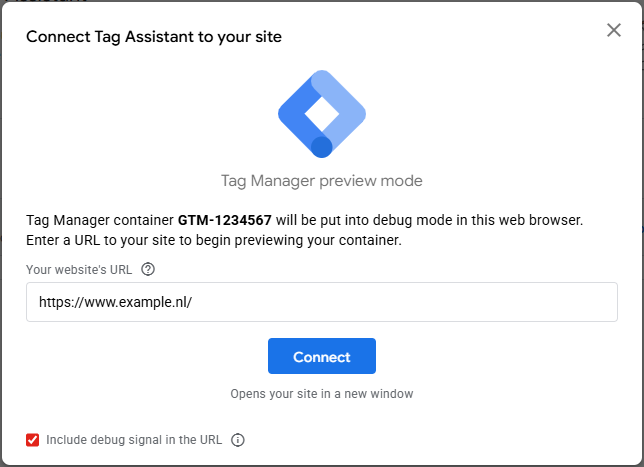
* Enter your website's URL and click **Connect**.
* Your website will open automatically. Go to your lead form, fill in the details, and submit the form.
* Go back to the Tag Assistant \[Connected] browser tab and check whether the Octanist tag was triggered. Go to the [Open Leads tab in Octanist](https://octanist.com/leads/open/) and refresh the page. Is your test visible?
* If it is not working, please contact [*support@octanist.com*](mailto:support@octanist.com).
* If it was successful, go back to the Tag Assistant browser tab and click the **X** in the upper left corner to disconnect. Click **Stop Debugging**.
* You can close this tab now.
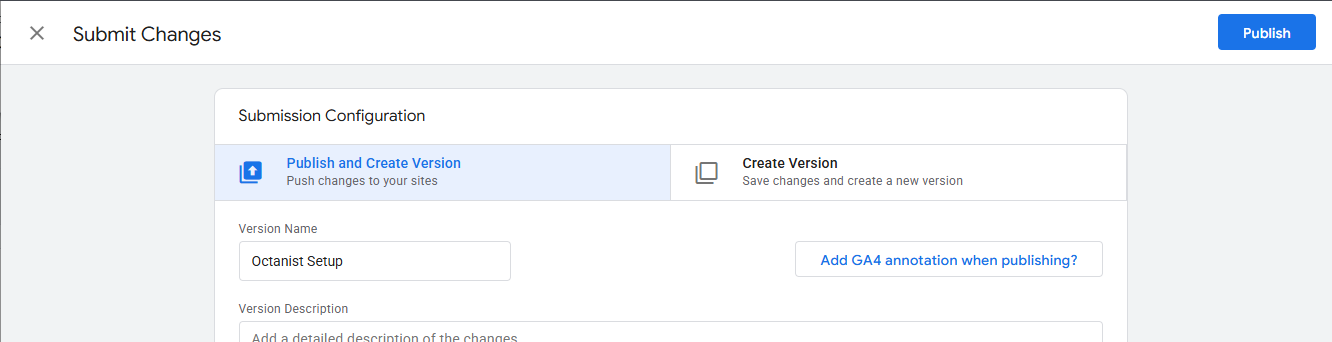
* **Publish** the container once everything works correctly.
* Click the blue **Submit** button in the upper right corner (next to the Preview button).
* Click **Publish**.
* You are all set!
* Test on the live website.
* Open an **incognito browser**.
* Perform a **test form submission**.
* Check whether your **test lead is showing up in Octanist**.
***
## 4. Optional
### 4.1 Marketing Campaign Data
* Enter custom UTM parameters saved in a GTM variable.
* You can extract these parameters with the help of your web developer or technical web analyst.
* These parameters will be visible in the dashboard under **Source / Medium / Campaign**.
### 4.2 Consent
* By default, Google Consent Mode is used to determine the user's consent preferences. If you have implemented this, you do not need to change this setting.
* You can also use the **Manual Consent Setting**, which allows you to pass your own consent parameters. Please return them as `Granted` or `Denied`, using exactly this format and capitalization.
* For more details, refer to our [Consent Documentation](https://docs.octanist.com/user-consent/consent-mode).
### 4.3 Custom Domain Delivery
* By default, leave this field blank.
* Here, you can add a custom domain for your Octanist environment. This feature is only available upon request via [support@octanist.com](mailto:support@octanist.com).
***
## 5. Octanist - Outgoing Integrations
Your data stream is now active! For setting up outgoing integrations, refer to our [Outgoing Integrations](https://docs.octanist.com/outgoing-integrations/google-ads/) documentation.
 ***
## 2. Prepare the Website (+ email to web developer)
* To send lead data to Octanist, the data must be available on the website. We highly recommend using a [**dataLayer**](https://developers.google.com/tag-platform/tag-manager/datalayer) **push event** to ensure consistency and robust measurement.
* Ensure the lead data is placed in the dataLayer. Ask a developer to implement the following code to activate the dataLayer push after a lead form is submitted:
***
## 2. Prepare the Website (+ email to web developer)
* To send lead data to Octanist, the data must be available on the website. We highly recommend using a [**dataLayer**](https://developers.google.com/tag-platform/tag-manager/datalayer) **push event** to ensure consistency and robust measurement.
* Ensure the lead data is placed in the dataLayer. Ask a developer to implement the following code to activate the dataLayer push after a lead form is submitted:
 * Navigate to **User-Defined Variables**. Click **New** on the right-hand side to create a new variable.
* For email, give it the name: **DLV - user\_data.email**
* Click on **Variable Configuration**.
* Click on **Data Layer Variable** (under Page Variables).
* Navigate to **User-Defined Variables**. Click **New** on the right-hand side to create a new variable.
* For email, give it the name: **DLV - user\_data.email**
* Click on **Variable Configuration**.
* Click on **Data Layer Variable** (under Page Variables).
 * Fill in Data Layer Variable Name: **user\_data.email**
* Click on **Save**.
* Fill in Data Layer Variable Name: **user\_data.email**
* Click on **Save**.
 * **Repeat these steps** to create variables for **Name** and **Phone\_number** as well:
* DLV - user\_data.name
* Data Layer Variable Name: **user\_data.name**
* DLV - user\_data.phone\_number
* Data Layer Variable Name: **user\_data.phone\_number**
* The setup should look like this:
* **Repeat these steps** to create variables for **Name** and **Phone\_number** as well:
* DLV - user\_data.name
* Data Layer Variable Name: **user\_data.name**
* DLV - user\_data.phone\_number
* Data Layer Variable Name: **user\_data.phone\_number**
* The setup should look like this:
 ### 3.3 Create the Custom Event *submit\_lead\_form*
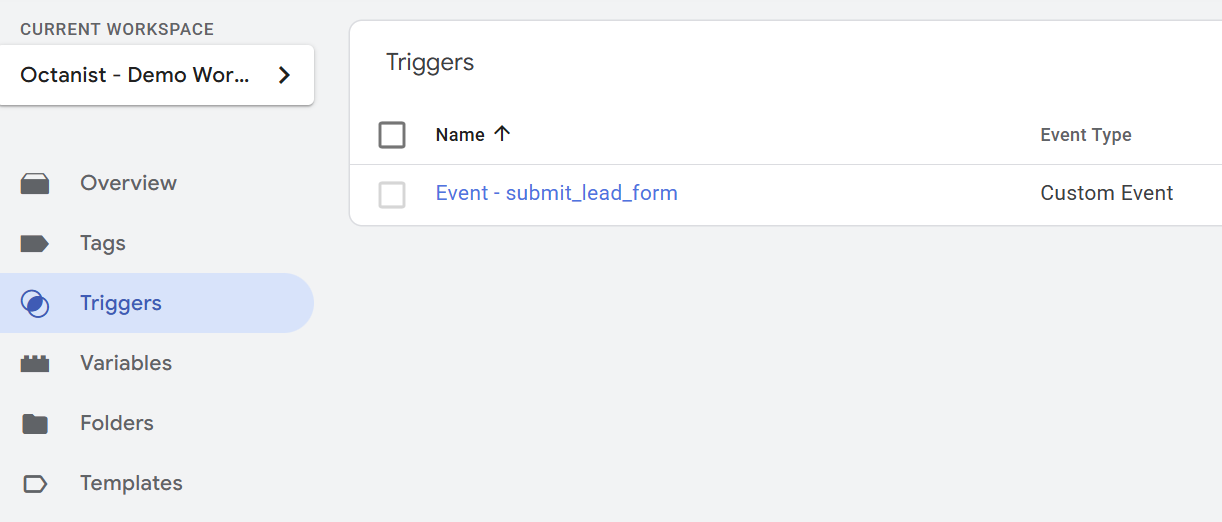 * Go to **Triggers** on the left-hand side.
* Click on **New**.
* Give it the name: **Event - submit\_lead\_form**
* Click on **Trigger Configuration** and select **Custom Event** (under Other).
* Go to **Triggers** on the left-hand side.
* Click on **New**.
* Give it the name: **Event - submit\_lead\_form**
* Click on **Trigger Configuration** and select **Custom Event** (under Other).
 * Fill in the "Event name" field with **submit\_lead\_form**.
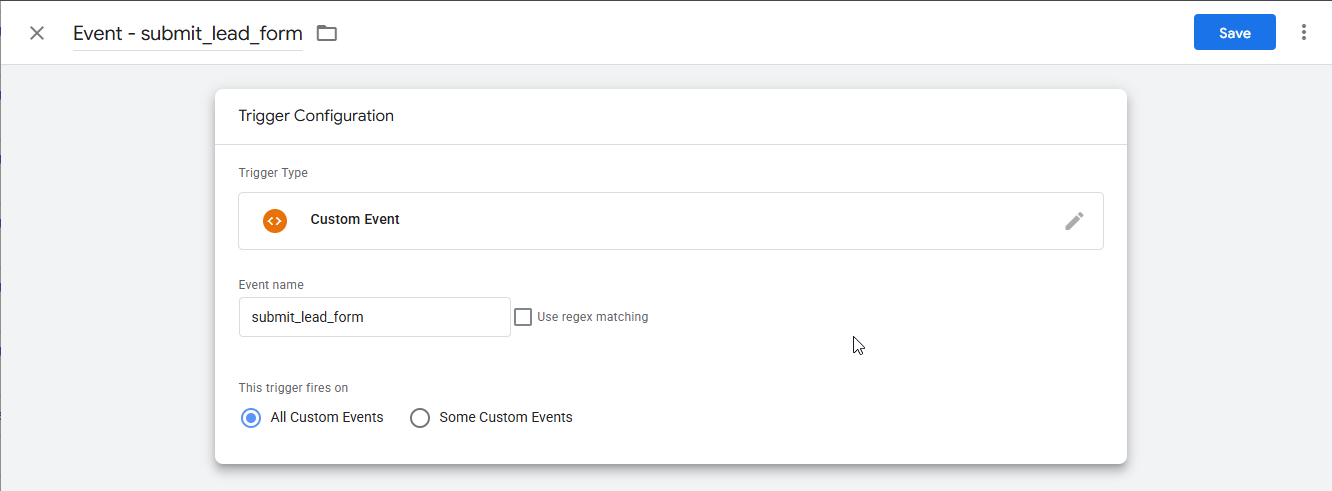 * Leave the remaining settings as they are and click on **Save**.
### 3.4 Add the Template
* Go to **Templates > Tag Templates > Search Gallery**.
* Search for "Octanist" and click on our Google-Verified Tag Template.
* Leave the remaining settings as they are and click on **Save**.
### 3.4 Add the Template
* Go to **Templates > Tag Templates > Search Gallery**.
* Search for "Octanist" and click on our Google-Verified Tag Template.
 * Click the **Add to Workspace** button.
 * Confirm and click **Add**.
### 3.5 Configure the Tag
* Go to **Tags**.
* Click **New** to create a new tag and give it the name: **Octanist - Offline Conversion Tracking**.
* Click on **Tag Configuration** and select the tag type: **Octanist - Offline Conversion Tracking** (GALLERY), under "Custom".
* Enter your **Octanist ID**. *You saved this at the end of step 1.*
* Click the **add variable** icons and add the Data Layer variables configured in step 3.2. It should look like this:
* Confirm and click **Add**.
### 3.5 Configure the Tag
* Go to **Tags**.
* Click **New** to create a new tag and give it the name: **Octanist - Offline Conversion Tracking**.
* Click on **Tag Configuration** and select the tag type: **Octanist - Offline Conversion Tracking** (GALLERY), under "Custom".
* Enter your **Octanist ID**. *You saved this at the end of step 1.*
* Click the **add variable** icons and add the Data Layer variables configured in step 3.2. It should look like this:
 * Set the trigger. Click on **Triggering** below the Tag Configuration.
* Select the **Custom Event** for the **submit\_lead\_form** trigger created in step 3.3.
* Set the trigger. Click on **Triggering** below the Tag Configuration.
* Select the **Custom Event** for the **submit\_lead\_form** trigger created in step 3.3.
 * Leave the remaining settings as they are. Click **Save** in the upper right corner.
### 3.6 Test and Publish
* **Test** the form using GTM debug mode.
* Click **Preview** in the upper right corner (next to the Submit button).
* Enter your website's URL and click **Connect**.
* Leave the remaining settings as they are. Click **Save** in the upper right corner.
### 3.6 Test and Publish
* **Test** the form using GTM debug mode.
* Click **Preview** in the upper right corner (next to the Submit button).
* Enter your website's URL and click **Connect**.
 * Your website will open automatically. Go to your lead form, fill in the details, and submit the form.
* Go back to the Tag Assistant \[Connected] browser tab and check whether the Octanist tag was triggered. Go to the [Open Leads tab in Octanist](https://octanist.com/leads/open/) and refresh the page. Is your test visible?
* If it is not working, please contact [*support@octanist.com*](mailto:support@octanist.com).
* If it was successful, go back to the Tag Assistant browser tab and click the **X** in the upper left corner to disconnect. Click **Stop Debugging**.
* You can close this tab now.
* **Publish** the container once everything works correctly.
* Click the blue **Submit** button in the upper right corner (next to the Preview button).
* Click **Publish**.
* Your website will open automatically. Go to your lead form, fill in the details, and submit the form.
* Go back to the Tag Assistant \[Connected] browser tab and check whether the Octanist tag was triggered. Go to the [Open Leads tab in Octanist](https://octanist.com/leads/open/) and refresh the page. Is your test visible?
* If it is not working, please contact [*support@octanist.com*](mailto:support@octanist.com).
* If it was successful, go back to the Tag Assistant browser tab and click the **X** in the upper left corner to disconnect. Click **Stop Debugging**.
* You can close this tab now.
* **Publish** the container once everything works correctly.
* Click the blue **Submit** button in the upper right corner (next to the Preview button).
* Click **Publish**.
 * You are all set!
* Test on the live website.
* Open an **incognito browser**.
* Perform a **test form submission**.
* Check whether your **test lead is showing up in Octanist**.
***
## 4. Optional
### 4.1 Marketing Campaign Data
* Enter custom UTM parameters saved in a GTM variable.
* You can extract these parameters with the help of your web developer or technical web analyst.
* These parameters will be visible in the dashboard under **Source / Medium / Campaign**.
### 4.2 Consent
* By default, Google Consent Mode is used to determine the user's consent preferences. If you have implemented this, you do not need to change this setting.
* You can also use the **Manual Consent Setting**, which allows you to pass your own consent parameters. Please return them as `Granted` or `Denied`, using exactly this format and capitalization.
* For more details, refer to our [Consent Documentation](https://docs.octanist.com/user-consent/consent-mode).
### 4.3 Custom Domain Delivery
* By default, leave this field blank.
* Here, you can add a custom domain for your Octanist environment. This feature is only available upon request via [support@octanist.com](mailto:support@octanist.com).
***
## 5. Octanist - Outgoing Integrations
Your data stream is now active! For setting up outgoing integrations, refer to our [Outgoing Integrations](https://docs.octanist.com/outgoing-integrations/google-ads/) documentation.
* You are all set!
* Test on the live website.
* Open an **incognito browser**.
* Perform a **test form submission**.
* Check whether your **test lead is showing up in Octanist**.
***
## 4. Optional
### 4.1 Marketing Campaign Data
* Enter custom UTM parameters saved in a GTM variable.
* You can extract these parameters with the help of your web developer or technical web analyst.
* These parameters will be visible in the dashboard under **Source / Medium / Campaign**.
### 4.2 Consent
* By default, Google Consent Mode is used to determine the user's consent preferences. If you have implemented this, you do not need to change this setting.
* You can also use the **Manual Consent Setting**, which allows you to pass your own consent parameters. Please return them as `Granted` or `Denied`, using exactly this format and capitalization.
* For more details, refer to our [Consent Documentation](https://docs.octanist.com/user-consent/consent-mode).
### 4.3 Custom Domain Delivery
* By default, leave this field blank.
* Here, you can add a custom domain for your Octanist environment. This feature is only available upon request via [support@octanist.com](mailto:support@octanist.com).
***
## 5. Octanist - Outgoing Integrations
Your data stream is now active! For setting up outgoing integrations, refer to our [Outgoing Integrations](https://docs.octanist.com/outgoing-integrations/google-ads/) documentation.