> ## Documentation Index
> Fetch the complete documentation index at: https://octanist.com/docs/llms.txt
> Use this file to discover all available pages before exploring further.
# Tracking pixel
> Install the Octanist pixel to track sessions, page views, attribution data, and form submissions.
The Octanist pixel is the default way to connect a website to Octanist. It tracks sessions and page views, captures campaign attribution such as click IDs and UTM parameters, and can optionally detect lead forms on the website.
For WordPress sites, use the [WordPress plugin](/docs/incoming-integrations/wordpress) instead. The plugin serves the same pixel through your own WordPress domain and captures supported form submissions server-side.
## What the pixel captures
The pixel sends these signals to Octanist:
* Page views and session activity
* Landing page, path, referrer, device, country, and user-agent context
* Click IDs such as `gclid`, `gbraid`, `wbraid`, `fbclid`, `msclkid`, `li_fat_id`, `ttclid`, `twclid`, `rdt_cid`, and `sccid`
* UTM parameters such as `utm_source`, `utm_medium`, `utm_campaign`, `utm_content`, and `utm_term`
* Consent state, when it can be detected
* Form submissions, when form auto-detection is enabled
## Get your installation script
1. Open Octanist.
2. Go to **Settings > Tracking**.
3. Copy the pixel script.
4. Install it site-wide, preferably in the `` of every public page.
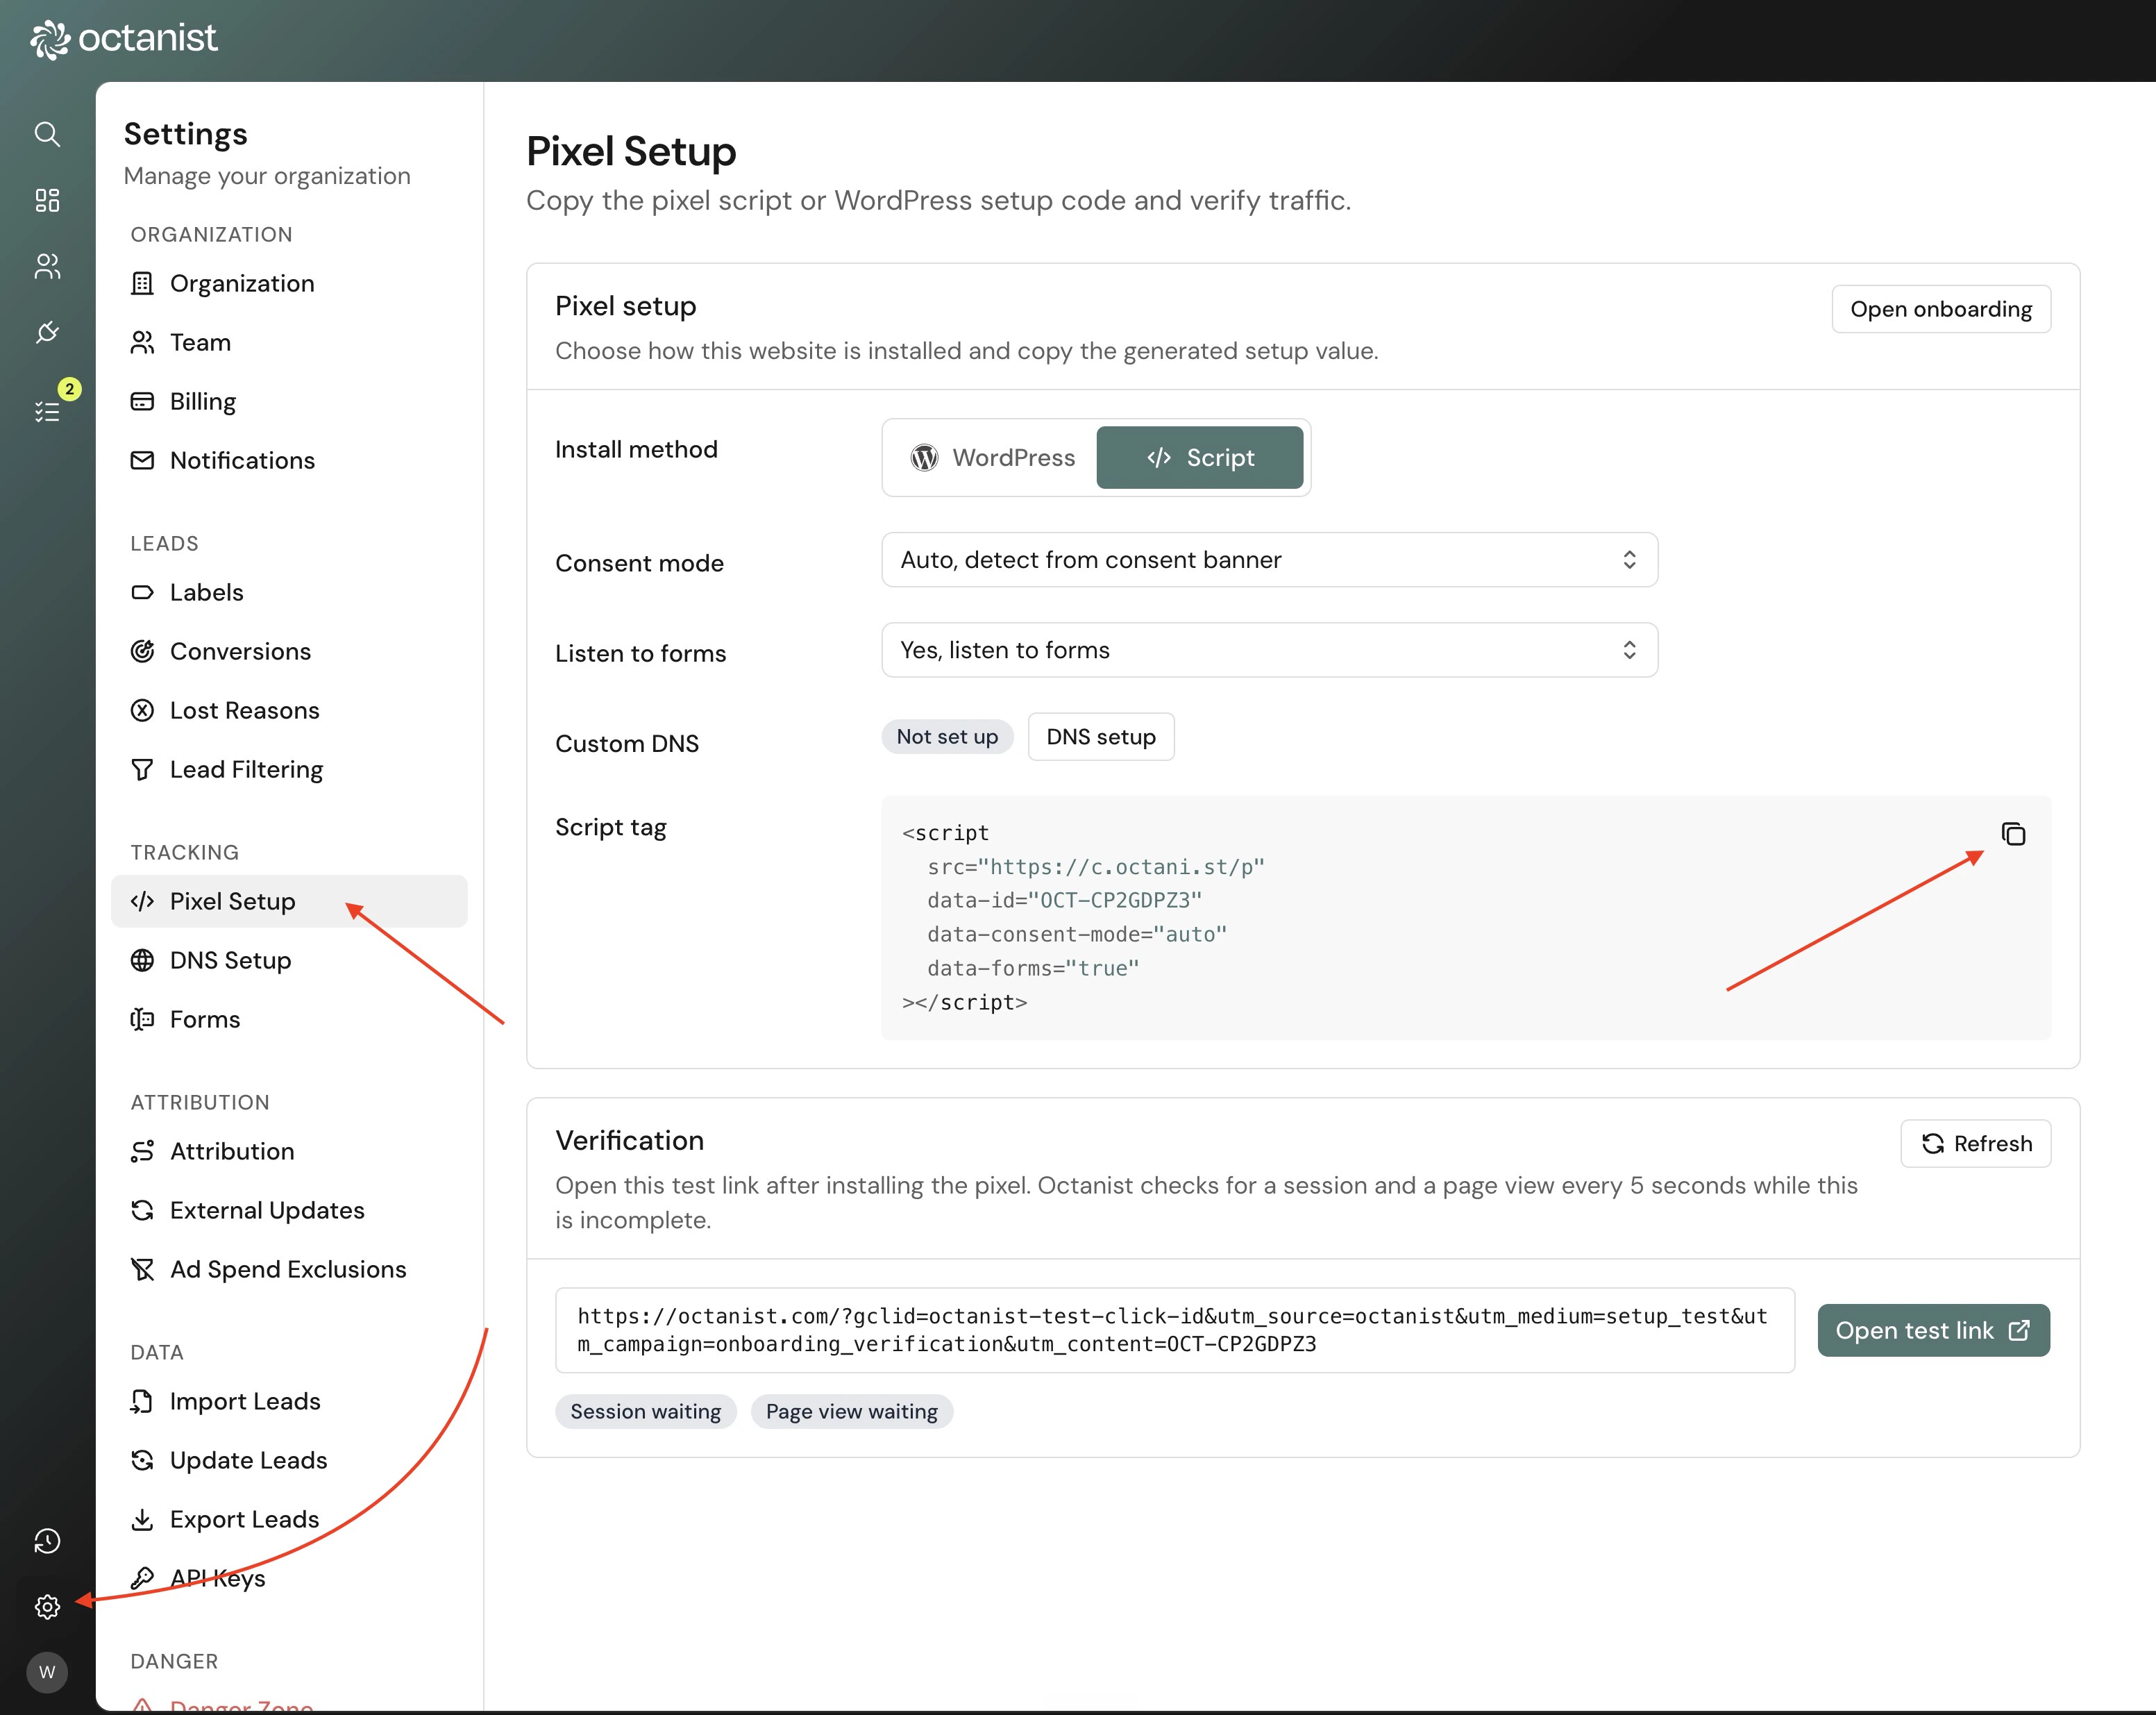 The script looks like this:
```html theme={null}
```
Replace `OCT-XXXXXXXX` only with the measurement ID shown in your Octanist account. Do not reuse a measurement ID from another organisation.
## Script attributes
| Attribute | Required | Description |
| ------------------- | -------- | ------------------------------------------------------------------------------------------------------ |
| `src` | Yes | The pixel script URL. This is usually `https://c.octani.st/p` unless you use a custom tracking domain. |
| `data-id` | Yes | Your Octanist measurement ID, shown in the dashboard as `OCT-XXXXXXXX`. |
| `data-consent-mode` | No | Controls consent behavior. Use `auto`, `granted`, or `denied`. |
| `data-forms` | No | Enables browser-side form auto-detection when set to `true`. |
## Consent mode
Use `data-consent-mode="auto"` unless you have a specific reason to choose another mode.
| Mode | Behavior |
| --------- | ------------------------------------------------------------------------------------------- |
| `auto` | Octanist tries to detect common consent management platforms and Google Consent Mode state. |
| `granted` | Use this only when the script loads after consent has already been granted. |
| `denied` | The pixel runs in cookieless mode and does not store marketing or analytics consent. |
For more detail, see [Consent mode](/docs/user-consent/consent-mode).
## Form capture
When `data-forms="true"` is present, the pixel can detect simple lead forms in the browser. This is useful for non-WordPress websites where server-side form hooks are not available.
For WordPress websites, the WordPress plugin is preferred because it captures supported form submissions server-side. Server-side capture is usually more reliable for AJAX forms, captcha-protected forms, and theme/plugin combinations that change browser behavior.
If your site needs to send a form submission from custom JavaScript, use the [Client-side API](/docs/incoming-integrations/client-side-api).
### Exclude a form from automatic capture
Add `data-octa-ignore` to a form when the pixel should not automatically capture that form:
```html theme={null}
```
Use this for forms that should not become leads, forms that contain sensitive data, or custom JavaScript forms that call `window.OCT.submitLeadForm(...)` manually after a successful submission.
`data-octa-ignore` only disables automatic form capture for that form. It does not disable page views, session tracking, consent handling, or the hidden `octa_sid` field.
## Server-side form capture
Use [server-side form capture](/docs/incoming-integrations/server-side-capturing) when browser-side form detection is unreliable, blocked by another script, or not appropriate for your form stack.
## Custom DNS
Most websites can use the default Octanist pixel domain. If you want to serve the pixel through your own subdomain, see [DNS setup](/docs/incoming-integrations/dns-setup).
## Form mapping
When Octanist detects a new form, you may need to map its fields before submissions become leads. See [Form mapping](/docs/incoming-integrations/form-mapping).
## Debugging
Use the [Octanist Debugger](/docs/troubleshooting/octanist-debugger) when you need to inspect whether the pixel, consent state, dataLayer, and form detection are working on a page.
## Custom tracking domains
Most websites can use the default pixel domain. If your account uses a custom tracking domain, Octanist will show a script with that domain instead of `c.octani.st`.
Custom tracking domains should be installed exactly as shown in Octanist. Do not change the `src` host manually unless support has confirmed the domain is active.
## Verify the install
1. Publish the script on the live website.
2. Open the live website in a new browser session.
3. Submit a test lead form, if form tracking is enabled.
4. Return to Octanist and check the setup status and lead list.
If the pixel is installed correctly but no leads appear, check whether the form contains at least one identifier such as name, email, phone, or custom data.
The script looks like this:
```html theme={null}
```
Replace `OCT-XXXXXXXX` only with the measurement ID shown in your Octanist account. Do not reuse a measurement ID from another organisation.
## Script attributes
| Attribute | Required | Description |
| ------------------- | -------- | ------------------------------------------------------------------------------------------------------ |
| `src` | Yes | The pixel script URL. This is usually `https://c.octani.st/p` unless you use a custom tracking domain. |
| `data-id` | Yes | Your Octanist measurement ID, shown in the dashboard as `OCT-XXXXXXXX`. |
| `data-consent-mode` | No | Controls consent behavior. Use `auto`, `granted`, or `denied`. |
| `data-forms` | No | Enables browser-side form auto-detection when set to `true`. |
## Consent mode
Use `data-consent-mode="auto"` unless you have a specific reason to choose another mode.
| Mode | Behavior |
| --------- | ------------------------------------------------------------------------------------------- |
| `auto` | Octanist tries to detect common consent management platforms and Google Consent Mode state. |
| `granted` | Use this only when the script loads after consent has already been granted. |
| `denied` | The pixel runs in cookieless mode and does not store marketing or analytics consent. |
For more detail, see [Consent mode](/docs/user-consent/consent-mode).
## Form capture
When `data-forms="true"` is present, the pixel can detect simple lead forms in the browser. This is useful for non-WordPress websites where server-side form hooks are not available.
For WordPress websites, the WordPress plugin is preferred because it captures supported form submissions server-side. Server-side capture is usually more reliable for AJAX forms, captcha-protected forms, and theme/plugin combinations that change browser behavior.
If your site needs to send a form submission from custom JavaScript, use the [Client-side API](/docs/incoming-integrations/client-side-api).
### Exclude a form from automatic capture
Add `data-octa-ignore` to a form when the pixel should not automatically capture that form:
```html theme={null}
```
Use this for forms that should not become leads, forms that contain sensitive data, or custom JavaScript forms that call `window.OCT.submitLeadForm(...)` manually after a successful submission.
`data-octa-ignore` only disables automatic form capture for that form. It does not disable page views, session tracking, consent handling, or the hidden `octa_sid` field.
## Server-side form capture
Use [server-side form capture](/docs/incoming-integrations/server-side-capturing) when browser-side form detection is unreliable, blocked by another script, or not appropriate for your form stack.
## Custom DNS
Most websites can use the default Octanist pixel domain. If you want to serve the pixel through your own subdomain, see [DNS setup](/docs/incoming-integrations/dns-setup).
## Form mapping
When Octanist detects a new form, you may need to map its fields before submissions become leads. See [Form mapping](/docs/incoming-integrations/form-mapping).
## Debugging
Use the [Octanist Debugger](/docs/troubleshooting/octanist-debugger) when you need to inspect whether the pixel, consent state, dataLayer, and form detection are working on a page.
## Custom tracking domains
Most websites can use the default pixel domain. If your account uses a custom tracking domain, Octanist will show a script with that domain instead of `c.octani.st`.
Custom tracking domains should be installed exactly as shown in Octanist. Do not change the `src` host manually unless support has confirmed the domain is active.
## Verify the install
1. Publish the script on the live website.
2. Open the live website in a new browser session.
3. Submit a test lead form, if form tracking is enabled.
4. Return to Octanist and check the setup status and lead list.
If the pixel is installed correctly but no leads appear, check whether the form contains at least one identifier such as name, email, phone, or custom data.