> ## Documentation Index
> Fetch the complete documentation index at: https://octanist.com/docs/llms.txt
> Use this file to discover all available pages before exploring further.
# Google BigQuery
> Send your closed, open, and converted leads to Google BigQuery for advanced data analysis.
## Table of Contents
1. [BigQuery Setup](#1-bigquery-setup)\
1.1 [Project and Billing](#11-project-and-billing)\
1.2 [Enabling APIs and Permissions](#12-enabling-apis-and-permissions)\
1.3 [Creating a Dataset and Table](#13-creating-a-dataset-and-table)\
1.4 [Schema and Table Expiration](#14-schema-and-table-expiration)
2. [Octanist Setup](#2-octanist-setup)
***
## 1. BigQuery Setup
### 1.1 Project and Billing
Before setting up Google BigQuery for Octanist, you need a BigQuery environment with billing enabled. Don't worry, the cost is typically between €0–€1 per month for storing data.
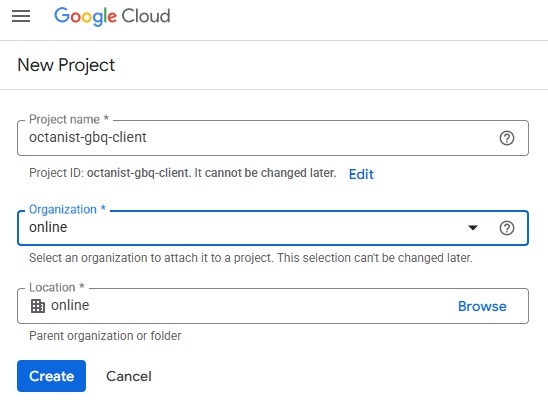
1. Go to [Google BigQuery](https://console.cloud.google.com/bigquery).
2. Sign in with the Google account you want to associate with the BigQuery environment. We recommend using a client-owned account or one that the client can always access.
3. Create or select a project. Use a clear and concise name, you **cannot change it** later.
4. Select the appropriate organisation (usually your business or your client's), then click **Create**.
 Search for **Billing** and open it. You must set up a billing account to enable and use the APIs required by Google BigQuery.
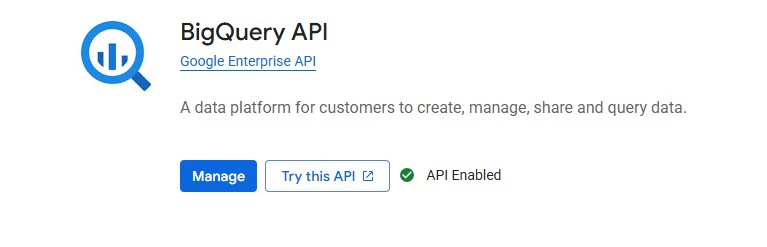
Next, search for **BigQuery API**, open it, and click **Enable**. A green checkmark will confirm activation.
Search for **Billing** and open it. You must set up a billing account to enable and use the APIs required by Google BigQuery.
Next, search for **BigQuery API**, open it, and click **Enable**. A green checkmark will confirm activation.
 ### 1.2 Enabling APIs and Permissions
Now, search for **IAM & Admin** and click **Grant Access**.
### 1.2 Enabling APIs and Permissions
Now, search for **IAM & Admin** and click **Grant Access**.
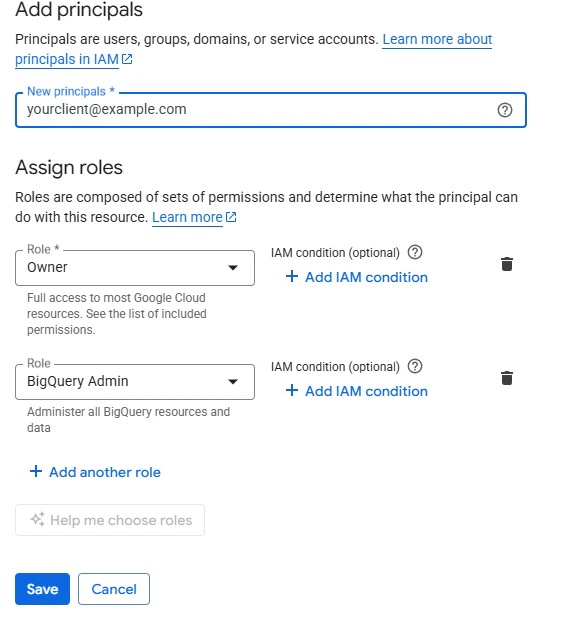
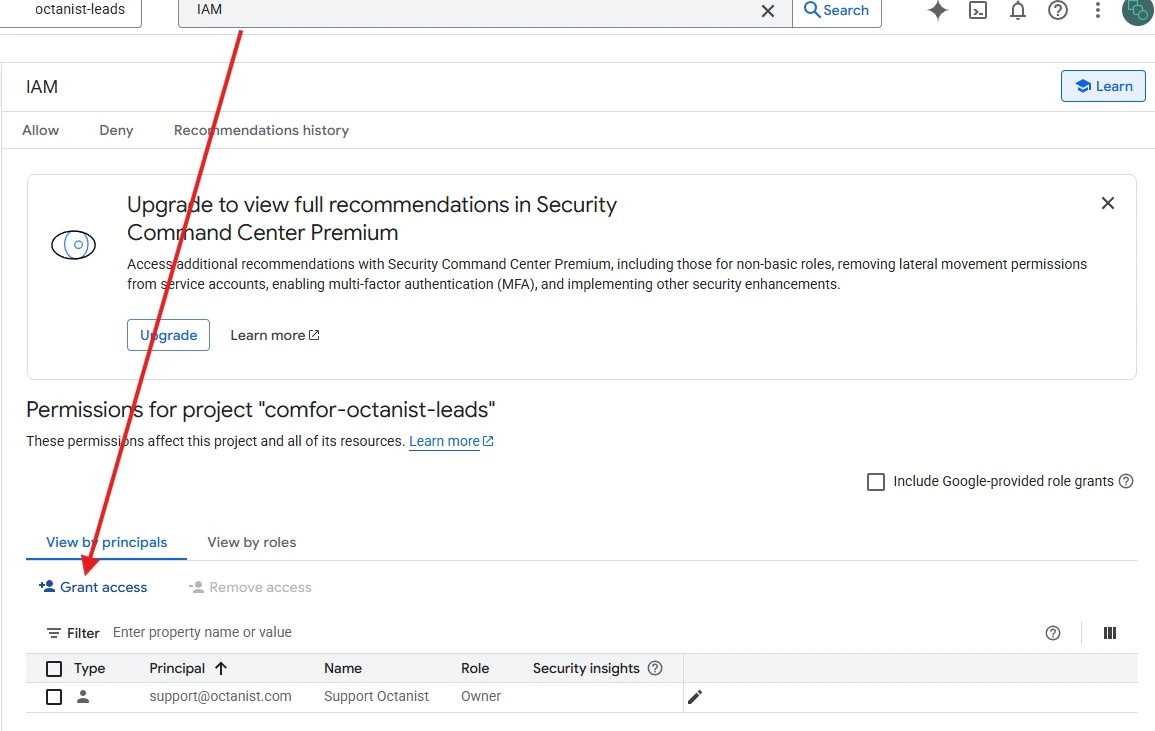 Add relevant users (e.g., your team, your agency's email, your client). Assign the **Owner** or **BigQuery Admin** role so they can manage the lead data and perform analysis.
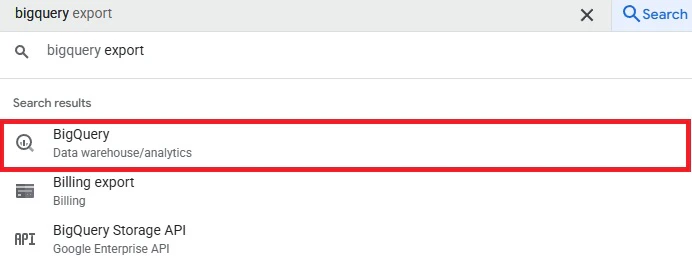
 Return to the search bar, search for **BigQuery**, and click it to open BigQuery Studio.
 ### 1.3 Creating a Dataset and Table
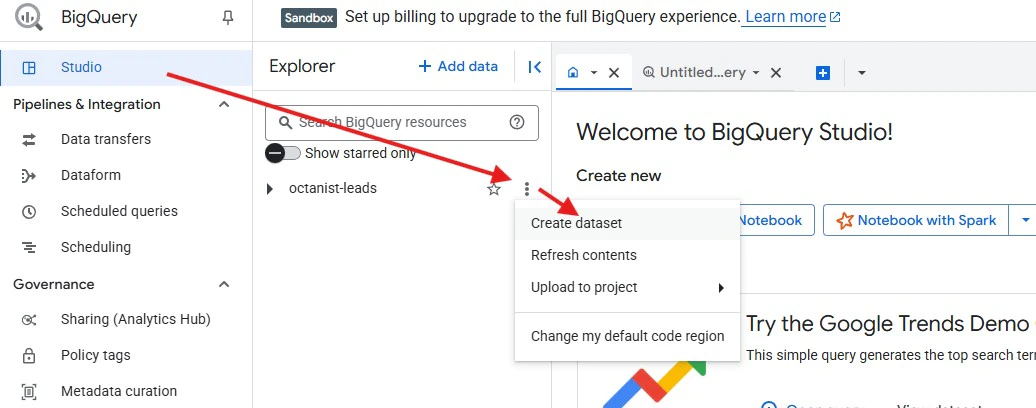
1. In BigQuery Studio, click the three dots next to your project name and select **Create dataset**.
### 1.3 Creating a Dataset and Table
1. In BigQuery Studio, click the three dots next to your project name and select **Create dataset**.
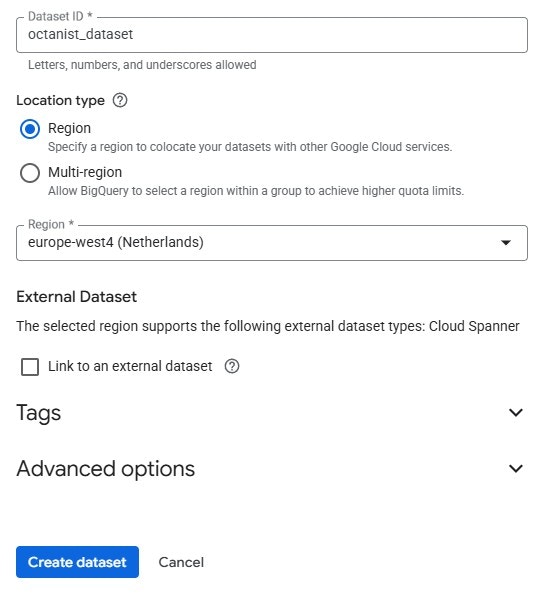
 2. Enter a **Dataset ID** (e.g., `octanist_dataset`). This cannot be changed later.
3. Choose a **Region** close to your business (e.g., a region containing "europe" or the "EU" multi-region).
2. Enter a **Dataset ID** (e.g., `octanist_dataset`). This cannot be changed later.
3. Choose a **Region** close to your business (e.g., a region containing "europe" or the "EU" multi-region).
 Once the dataset is created:
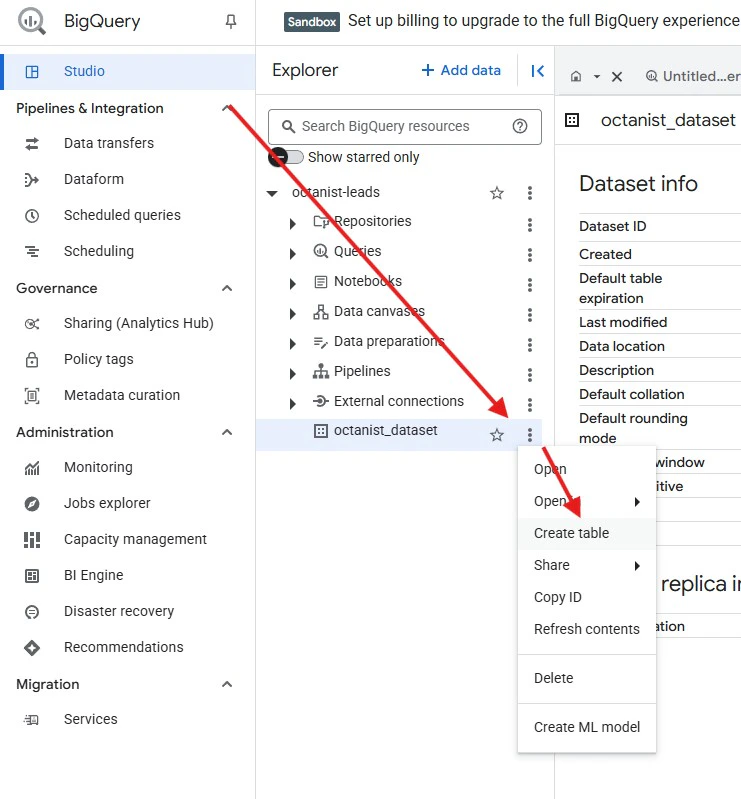
1. Click the three dots next to the dataset name and choose **Create table**.
Once the dataset is created:
1. Click the three dots next to the dataset name and choose **Create table**.
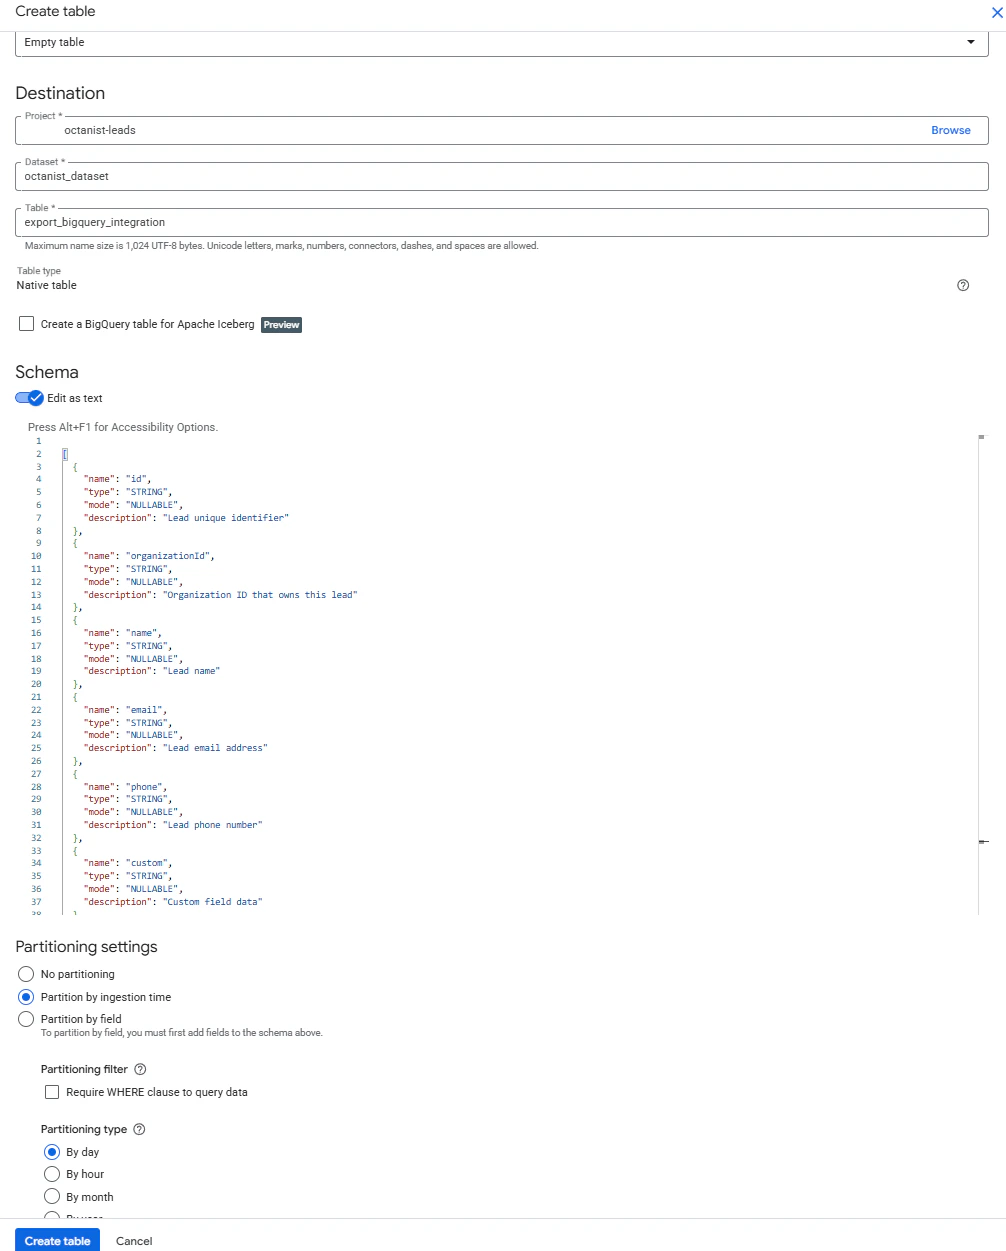
 2. In the Create Table menu:
* Select **Empty table**.
* Ensure the project and dataset are filled in correctly.
* Enter a **Table Name** (e.g., `export_bigquery_integration` or `exported_leads_octanist`).
3. Scroll down to **Partitioning Settings**:
* Set **Partition by ingestion time**.
* Choose **By day**.
This keeps the dataset manageable and cost-efficient.
4. Scroll up to **Schema**, switch to **Edit as text**, and paste the schema below:
```json theme={null}
[
{
"name": "id",
"type": "STRING",
"mode": "NULLABLE",
"description": "Lead unique identifier"
},
{
"name": "externalId",
"type": "STRING",
"mode": "NULLABLE",
"description": "Customer-owned lead identifier"
},
{
"name": "organizationId",
"type": "STRING",
"mode": "NULLABLE",
"description": "Organization ID that owns this lead"
},
{
"name": "name",
"type": "STRING",
"mode": "NULLABLE",
"description": "Lead name"
},
{
"name": "email",
"type": "STRING",
"mode": "NULLABLE",
"description": "Lead email address"
},
{
"name": "phone",
"type": "STRING",
"mode": "NULLABLE",
"description": "Lead phone number"
},
{
"name": "custom",
"type": "STRING",
"mode": "NULLABLE",
"description": "Custom field data"
},
{
"name": "gclid",
"type": "STRING",
"mode": "NULLABLE",
"description": "Google Click ID"
},
{
"name": "fbc",
"type": "STRING",
"mode": "NULLABLE",
"description": "Facebook Click ID"
},
{
"name": "fbp",
"type": "STRING",
"mode": "NULLABLE",
"description": "Facebook Browser ID"
},
{
"name": "ga4cid",
"type": "STRING",
"mode": "NULLABLE",
"description": "Google Analytics 4 Client ID"
},
{
"name": "ga4sid",
"type": "STRING",
"mode": "NULLABLE",
"description": "Google Analytics 4 Session ID"
},
{
"name": "li_fat_id",
"type": "STRING",
"mode": "NULLABLE",
"description": "LinkedIn First Party Ad Tracking ID"
},
{
"name": "msclkid",
"type": "STRING",
"mode": "NULLABLE",
"description": "Microsoft Click ID"
},
{
"name": "path",
"type": "STRING",
"mode": "NULLABLE",
"description": "Website path where lead was generated"
},
{
"name": "website",
"type": "STRING",
"mode": "NULLABLE",
"description": "Website domain"
},
{
"name": "ad_storage",
"type": "BOOLEAN",
"mode": "NULLABLE",
"description": "Google Consent Mode - Ad Storage"
},
{
"name": "ad_user_data",
"type": "BOOLEAN",
"mode": "NULLABLE",
"description": "Google Consent Mode - Ad User Data"
},
{
"name": "ad_personalization",
"type": "BOOLEAN",
"mode": "NULLABLE",
"description": "Google Consent Mode - Ad Personalization"
},
{
"name": "analytics_storage",
"type": "BOOLEAN",
"mode": "NULLABLE",
"description": "Google Consent Mode - Analytics Storage"
},
{
"name": "status",
"type": "STRING",
"mode": "NULLABLE",
"description": "Lead status: qualified, won, or lost"
},
{
"name": "note",
"type": "STRING",
"mode": "NULLABLE",
"description": "Notes about the lead"
},
{
"name": "utm_source",
"type": "STRING",
"mode": "NULLABLE",
"description": "UTM source parameter"
},
{
"name": "utm_medium",
"type": "STRING",
"mode": "NULLABLE",
"description": "UTM medium parameter"
},
{
"name": "utm_campaign",
"type": "STRING",
"mode": "NULLABLE",
"description": "UTM campaign parameter"
},
{
"name": "value",
"type": "FLOAT",
"mode": "NULLABLE",
"description": "Lead value"
},
{
"name": "currency",
"type": "STRING",
"mode": "NULLABLE",
"description": "Currency code (ISO 4217)"
},
{
"name": "conversionName",
"type": "STRING",
"mode": "NULLABLE",
"description": "Conversion name/type"
},
{
"name": "createdAt",
"type": "TIMESTAMP",
"mode": "NULLABLE",
"description": "When the lead was originally created"
},
{
"name": "updatedAt",
"type": "TIMESTAMP",
"mode": "NULLABLE",
"description": "When the lead was last updated"
},
{
"name": "labelId",
"type": "STRING",
"mode": "NULLABLE",
"description": "Associated label ID"
},
{
"name": "qualifiedAt",
"type": "TIMESTAMP",
"mode": "NULLABLE",
"description": "When the lead was qualified"
},
{
"name": "event_type",
"type": "STRING",
"mode": "NULLABLE",
"description": "Event type: win, qualified, lost"
},
{
"name": "event_timestamp",
"type": "TIMESTAMP",
"mode": "NULLABLE",
"description": "When the event was sent to BigQuery"
}
]
```
After this is set up, click **Create Table**. The settings should look as follows:
2. In the Create Table menu:
* Select **Empty table**.
* Ensure the project and dataset are filled in correctly.
* Enter a **Table Name** (e.g., `export_bigquery_integration` or `exported_leads_octanist`).
3. Scroll down to **Partitioning Settings**:
* Set **Partition by ingestion time**.
* Choose **By day**.
This keeps the dataset manageable and cost-efficient.
4. Scroll up to **Schema**, switch to **Edit as text**, and paste the schema below:
```json theme={null}
[
{
"name": "id",
"type": "STRING",
"mode": "NULLABLE",
"description": "Lead unique identifier"
},
{
"name": "externalId",
"type": "STRING",
"mode": "NULLABLE",
"description": "Customer-owned lead identifier"
},
{
"name": "organizationId",
"type": "STRING",
"mode": "NULLABLE",
"description": "Organization ID that owns this lead"
},
{
"name": "name",
"type": "STRING",
"mode": "NULLABLE",
"description": "Lead name"
},
{
"name": "email",
"type": "STRING",
"mode": "NULLABLE",
"description": "Lead email address"
},
{
"name": "phone",
"type": "STRING",
"mode": "NULLABLE",
"description": "Lead phone number"
},
{
"name": "custom",
"type": "STRING",
"mode": "NULLABLE",
"description": "Custom field data"
},
{
"name": "gclid",
"type": "STRING",
"mode": "NULLABLE",
"description": "Google Click ID"
},
{
"name": "fbc",
"type": "STRING",
"mode": "NULLABLE",
"description": "Facebook Click ID"
},
{
"name": "fbp",
"type": "STRING",
"mode": "NULLABLE",
"description": "Facebook Browser ID"
},
{
"name": "ga4cid",
"type": "STRING",
"mode": "NULLABLE",
"description": "Google Analytics 4 Client ID"
},
{
"name": "ga4sid",
"type": "STRING",
"mode": "NULLABLE",
"description": "Google Analytics 4 Session ID"
},
{
"name": "li_fat_id",
"type": "STRING",
"mode": "NULLABLE",
"description": "LinkedIn First Party Ad Tracking ID"
},
{
"name": "msclkid",
"type": "STRING",
"mode": "NULLABLE",
"description": "Microsoft Click ID"
},
{
"name": "path",
"type": "STRING",
"mode": "NULLABLE",
"description": "Website path where lead was generated"
},
{
"name": "website",
"type": "STRING",
"mode": "NULLABLE",
"description": "Website domain"
},
{
"name": "ad_storage",
"type": "BOOLEAN",
"mode": "NULLABLE",
"description": "Google Consent Mode - Ad Storage"
},
{
"name": "ad_user_data",
"type": "BOOLEAN",
"mode": "NULLABLE",
"description": "Google Consent Mode - Ad User Data"
},
{
"name": "ad_personalization",
"type": "BOOLEAN",
"mode": "NULLABLE",
"description": "Google Consent Mode - Ad Personalization"
},
{
"name": "analytics_storage",
"type": "BOOLEAN",
"mode": "NULLABLE",
"description": "Google Consent Mode - Analytics Storage"
},
{
"name": "status",
"type": "STRING",
"mode": "NULLABLE",
"description": "Lead status: qualified, won, or lost"
},
{
"name": "note",
"type": "STRING",
"mode": "NULLABLE",
"description": "Notes about the lead"
},
{
"name": "utm_source",
"type": "STRING",
"mode": "NULLABLE",
"description": "UTM source parameter"
},
{
"name": "utm_medium",
"type": "STRING",
"mode": "NULLABLE",
"description": "UTM medium parameter"
},
{
"name": "utm_campaign",
"type": "STRING",
"mode": "NULLABLE",
"description": "UTM campaign parameter"
},
{
"name": "value",
"type": "FLOAT",
"mode": "NULLABLE",
"description": "Lead value"
},
{
"name": "currency",
"type": "STRING",
"mode": "NULLABLE",
"description": "Currency code (ISO 4217)"
},
{
"name": "conversionName",
"type": "STRING",
"mode": "NULLABLE",
"description": "Conversion name/type"
},
{
"name": "createdAt",
"type": "TIMESTAMP",
"mode": "NULLABLE",
"description": "When the lead was originally created"
},
{
"name": "updatedAt",
"type": "TIMESTAMP",
"mode": "NULLABLE",
"description": "When the lead was last updated"
},
{
"name": "labelId",
"type": "STRING",
"mode": "NULLABLE",
"description": "Associated label ID"
},
{
"name": "qualifiedAt",
"type": "TIMESTAMP",
"mode": "NULLABLE",
"description": "When the lead was qualified"
},
{
"name": "event_type",
"type": "STRING",
"mode": "NULLABLE",
"description": "Event type: win, qualified, lost"
},
{
"name": "event_timestamp",
"type": "TIMESTAMP",
"mode": "NULLABLE",
"description": "When the event was sent to BigQuery"
}
]
```
After this is set up, click **Create Table**. The settings should look as follows:
 ### 1.4 Schema and Table Expiration
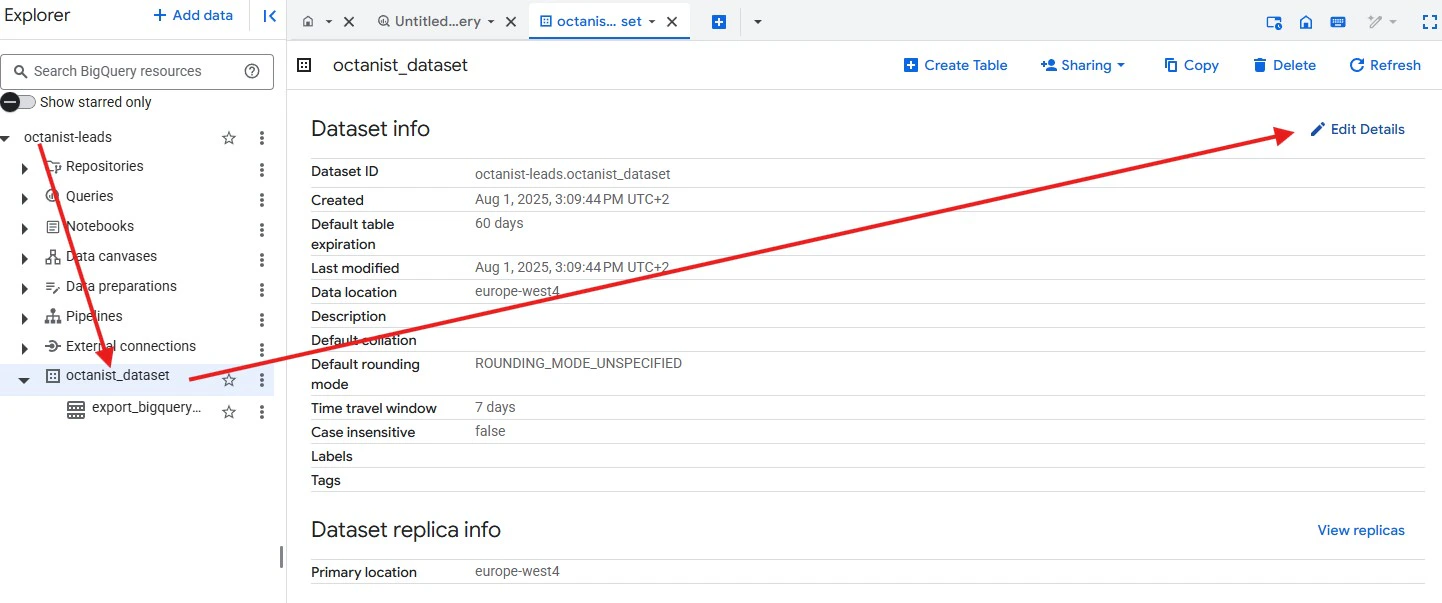
Before switching back to Octanist, click on the dataset (the square icon with four dots), then click **Edit Details** in the top right.
Uncheck **Enable table expiration**. Make sure this option is disabled otherwise your data will be deleted after 60 days.
### 1.4 Schema and Table Expiration
Before switching back to Octanist, click on the dataset (the square icon with four dots), then click **Edit Details** in the top right.
Uncheck **Enable table expiration**. Make sure this option is disabled otherwise your data will be deleted after 60 days.
 ***
## 2. Octanist Setup
Head back to Octanist and create an integration: [Create Integration](https://octanist.com/integrations/outgoing/new/)
1. Select **Google BigQuery**.
***
## 2. Octanist Setup
Head back to Octanist and create an integration: [Create Integration](https://octanist.com/integrations/outgoing/new/)
1. Select **Google BigQuery**.
 2. Grant Octanist access to your BigQuery account so it can insert lead data.
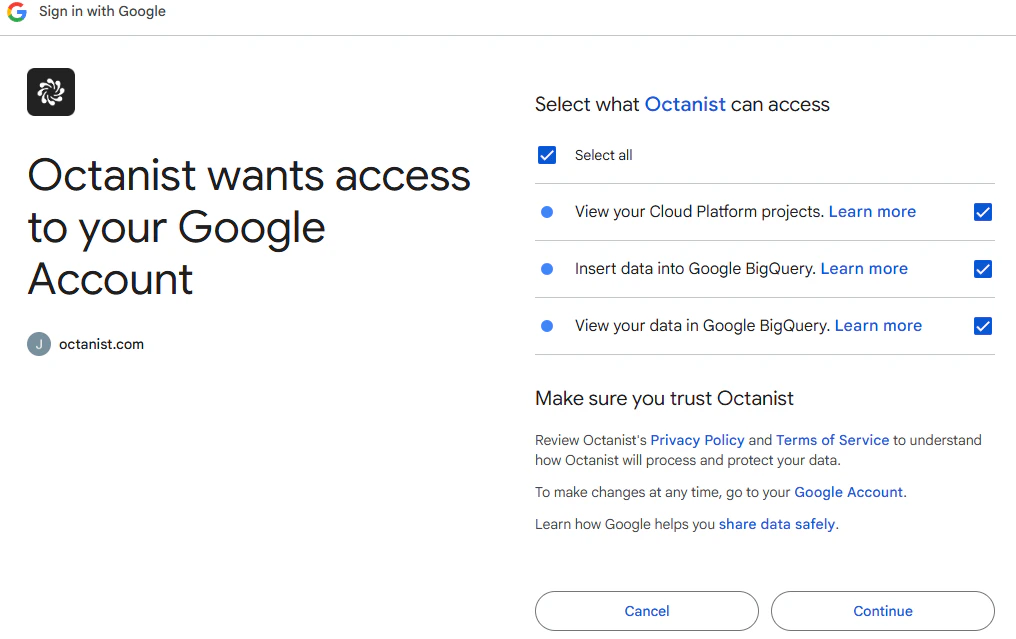 > **Note:** A second window may open during the authentication process. If it does, complete the setup in that window, then close it. This is related to Google Authentication and will be improved in future updates.
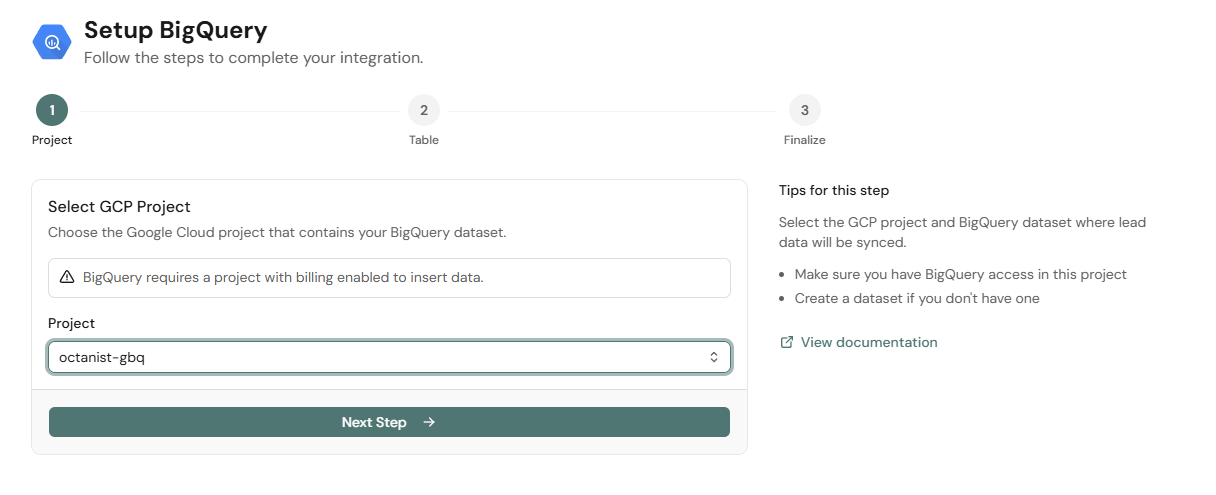
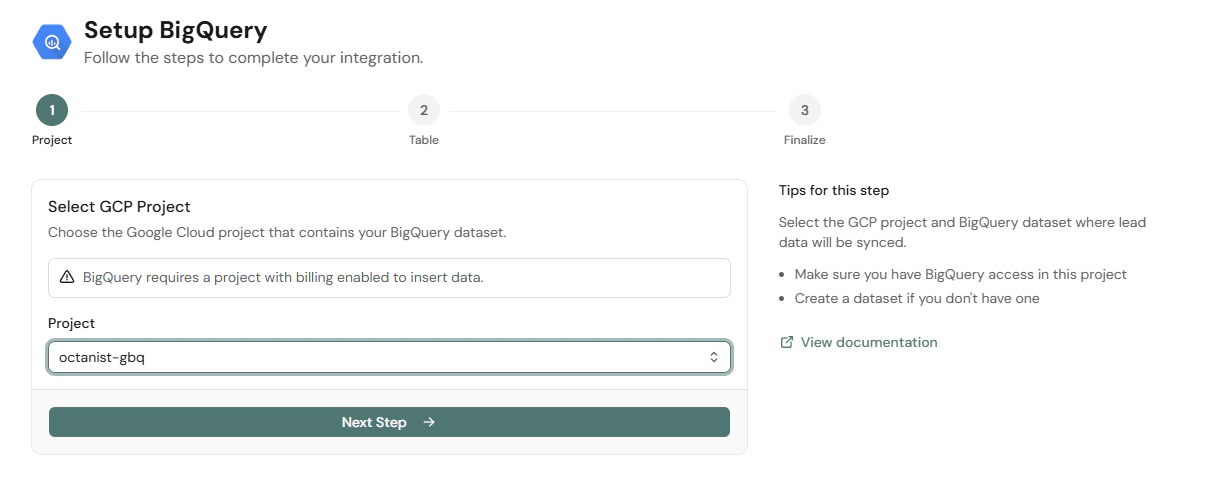
3. Select your BigQuery project this is the project where you created your Octanist table.
> **Note:** A second window may open during the authentication process. If it does, complete the setup in that window, then close it. This is related to Google Authentication and will be improved in future updates.
3. Select your BigQuery project this is the project where you created your Octanist table.
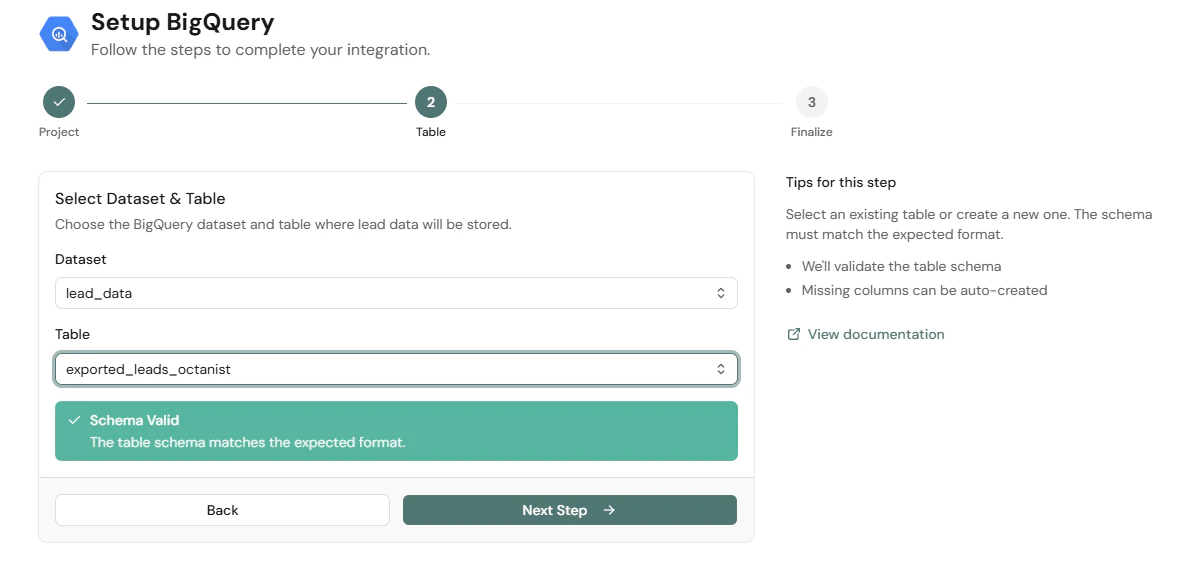
 4. In the next step, select the dataset and the table you created in Google BigQuery in the earlier steps.
Octanist will display a message confirming that the schema is valid and the format is as expected. If you followed the steps above exactly, this should always be valid.
Schema validation runs during setup and requires the `externalId` STRING field shown above. If you created the table before external lead IDs were introduced, add this nullable field before the next lead sync. Existing integrations are only checked when they are set up or reconfigured.
4. In the next step, select the dataset and the table you created in Google BigQuery in the earlier steps.
Octanist will display a message confirming that the schema is valid and the format is as expected. If you followed the steps above exactly, this should always be valid.
Schema validation runs during setup and requires the `externalId` STRING field shown above. If you created the table before external lead IDs were introduced, add this nullable field before the next lead sync. Existing integrations are only checked when they are set up or reconfigured.
 5. In the final step, you will see a summary of your current settings. Review these settings thoroughly.
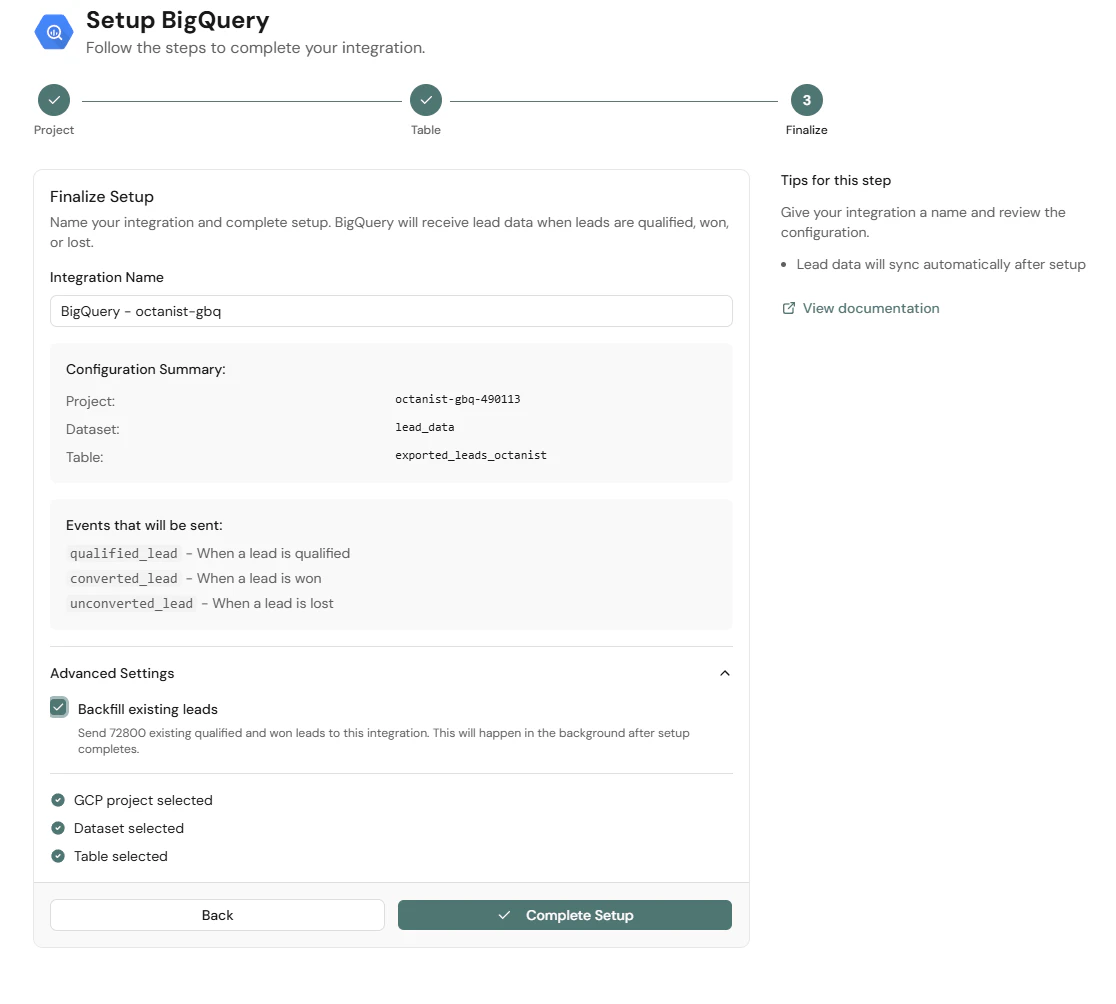 All qualified, won, and lost leads will be sent directly to BigQuery. If you want historical data in BigQuery, go to **Advanced Settings** and check **Backfill existing Leads**. This will perform a one-time backfill of all current won, lost, and qualified leads.
Once configured, you can start qualifying your leads these will be automatically sent to BigQuery.
All qualified, won, and lost leads will be sent directly to BigQuery. If you want historical data in BigQuery, go to **Advanced Settings** and check **Backfill existing Leads**. This will perform a one-time backfill of all current won, lost, and qualified leads.
Once configured, you can start qualifying your leads these will be automatically sent to BigQuery.