> ## Documentation Index
> Fetch the complete documentation index at: https://octanist.com/docs/llms.txt
> Use this file to discover all available pages before exploring further.
# Google Tag Manager Server Container
> Send your closed, open, and converted leads to your Server-Side Google Tag Manager container.
Server-Side Tagging is a powerful tool in your marketing analytics toolbox. With a Server-Side Google Tag Manager (sGTM) container, marketing and analytics specialists gain full control over the data sent to various platforms. With Octanist, you can use your qualified leads to build or modify integrations tailored to your setup.
**Note:** This is an advanced integration. General knowledge of Server-Side
Tagging and data matching is required.
### Prerequisites
* A [Server-Side Google Tag Manager](https://developers.google.com/tag-platform/tag-manager/server-side/intro) implementation
* An Octanist [**Serious Business**](https://octanist.com/pricing/) package
## Table of Contents
1. [Overview](#1-overview)
2. [Setting Up the Octanist sGTM Integration](#2-setting-up-the-octanist-sgtm-integration)
3. [Installing the Octanist Client Template](#3-installing-the-octanist-client-template)
4. [Sending Data via sGTM](#4-sending-data-via-sgtm)
5. [Example: Integration with Piwik Pro](#5-example-integration-with-piwik-pro)
***
## 1. Overview
This guide walks you through sending qualified leads from Octanist to your Server-Side Google Tag Manager container. By setting up this integration, you gain the flexibility to route Octanist data to any supported destination (e.g., Piwik Pro, Adform, Mailchimp).
***
## 2. Setting Up the Octanist sGTM Integration
1. Go to [octanist.com](http://octanist.com) and navigate to **Outgoing Integrations**.
2. Click **Add New** and select the **GTM Server Container** option.
3. Enter a concise name for your integration (e.g., *Octanist - sGTM*). The name does not affect functionality.
4. Provide your **Server Container URL** — this is the endpoint that will receive your data (e.g., `https://measure.example.com` or `https://example.com/measure`).
### Advanced Debugging (Optional)
1. Under **Advanced Options**, enter your **X-Gtm-Server-Preview HTTP header**. This allows you to debug hits in the server container.
* To find your header, enter **Debug Mode** in your server container.
* Click the three dots in the top-right corner, then select **Send Request Manually**.
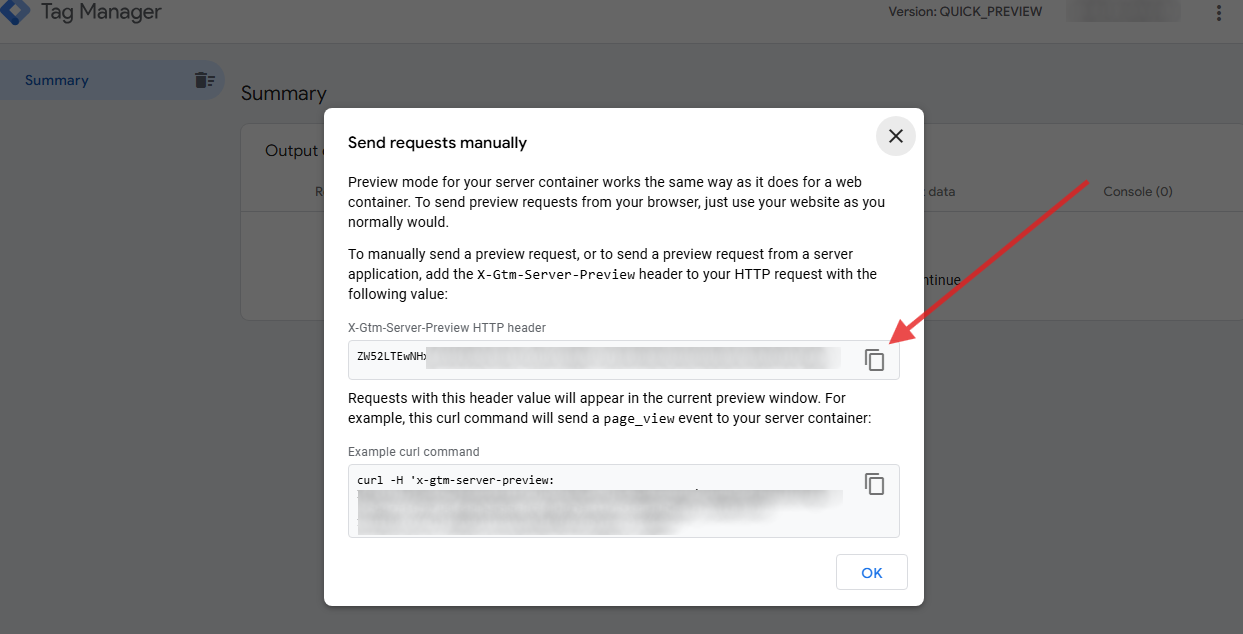 * Copy the value under **X-Gtm-Server-Preview HTTP header**.
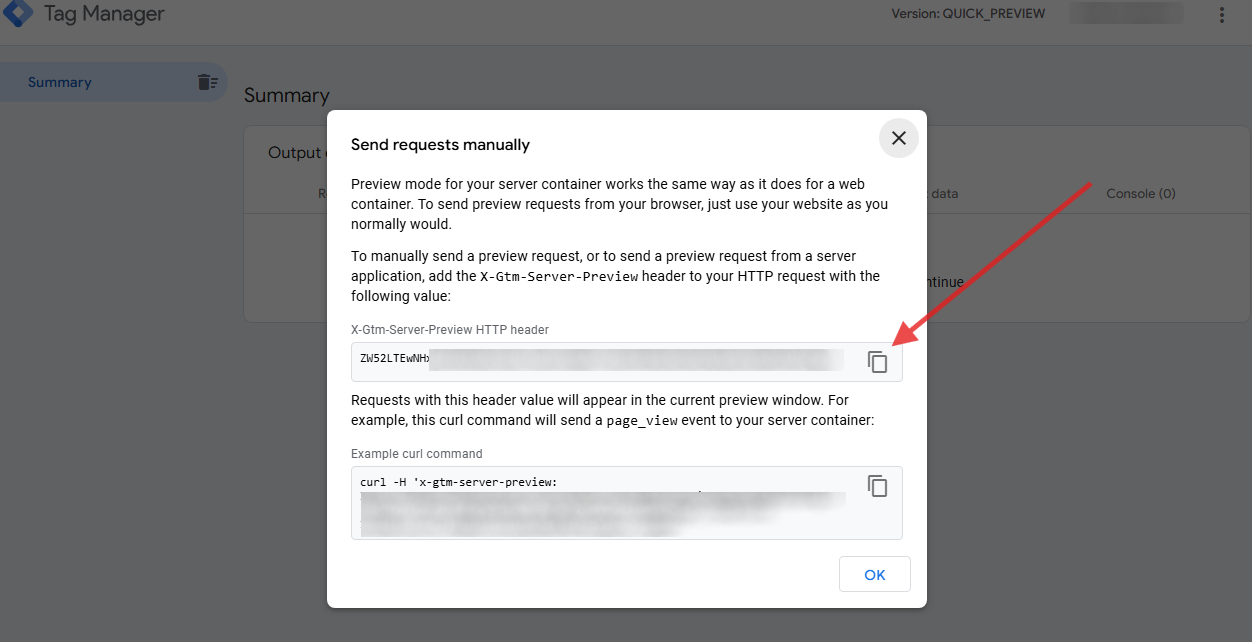 2. Paste this value under **Advanced > X-Gtm-Server-Preview HTTP header** in Octanist.
3. Click **Create Server Integration**, then download the **sGTM Octanist Client Template**.
When downloading the sGTM Client Template, you are receiving the most
up-to-date version. Google Tag Manager does not currently provide a template
gallery for Server-Side clients. This client is stable and unlikely to require
future updates.
***
## 3. Installing the Octanist Client Template
1. In your server container, create a new **Workspace** (e.g., *Octanist - Server-Side Setup*).
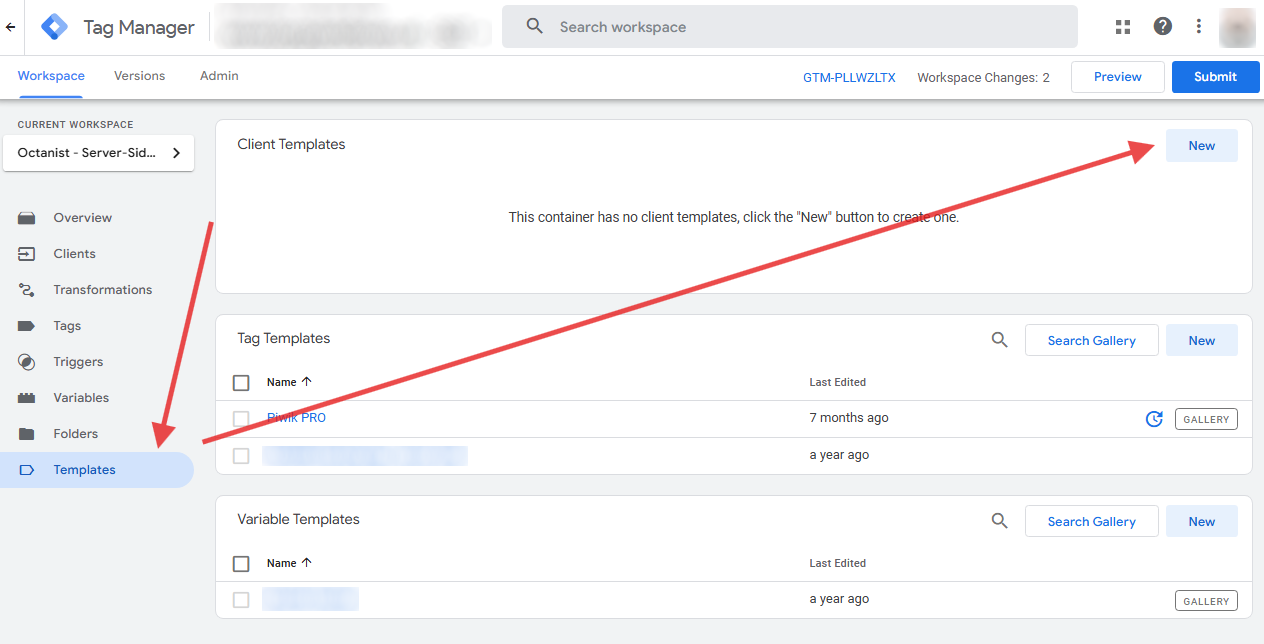
2. Navigate to **Templates > Client Templates > New**.
2. Paste this value under **Advanced > X-Gtm-Server-Preview HTTP header** in Octanist.
3. Click **Create Server Integration**, then download the **sGTM Octanist Client Template**.
When downloading the sGTM Client Template, you are receiving the most
up-to-date version. Google Tag Manager does not currently provide a template
gallery for Server-Side clients. This client is stable and unlikely to require
future updates.
***
## 3. Installing the Octanist Client Template
1. In your server container, create a new **Workspace** (e.g., *Octanist - Server-Side Setup*).
2. Navigate to **Templates > Client Templates > New**.
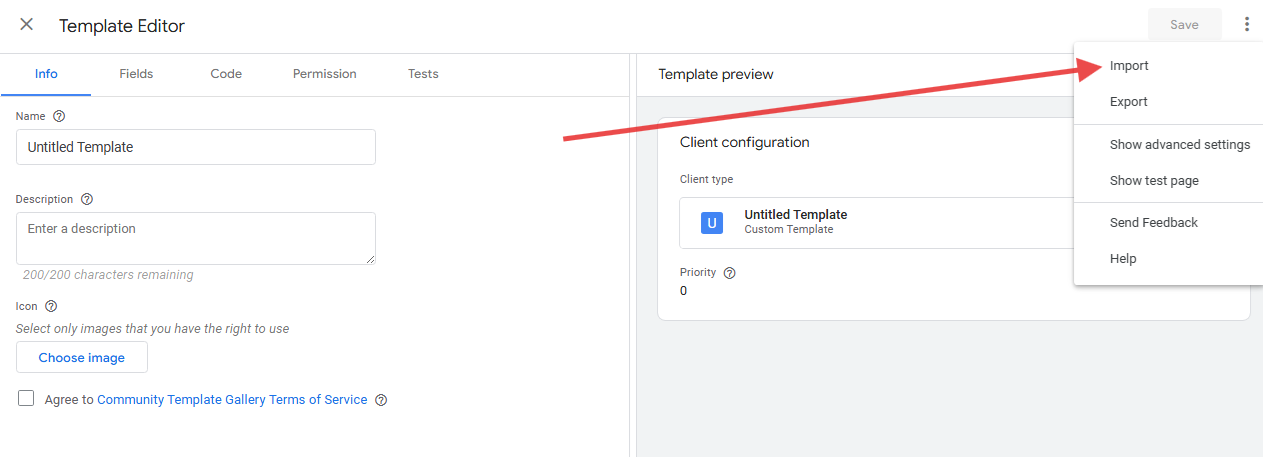
 3. Click the three dots in the top-right corner, then select **Import**.
4. Upload the `template.tpl` file you downloaded earlier.
3. Click the three dots in the top-right corner, then select **Import**.
4. Upload the `template.tpl` file you downloaded earlier.
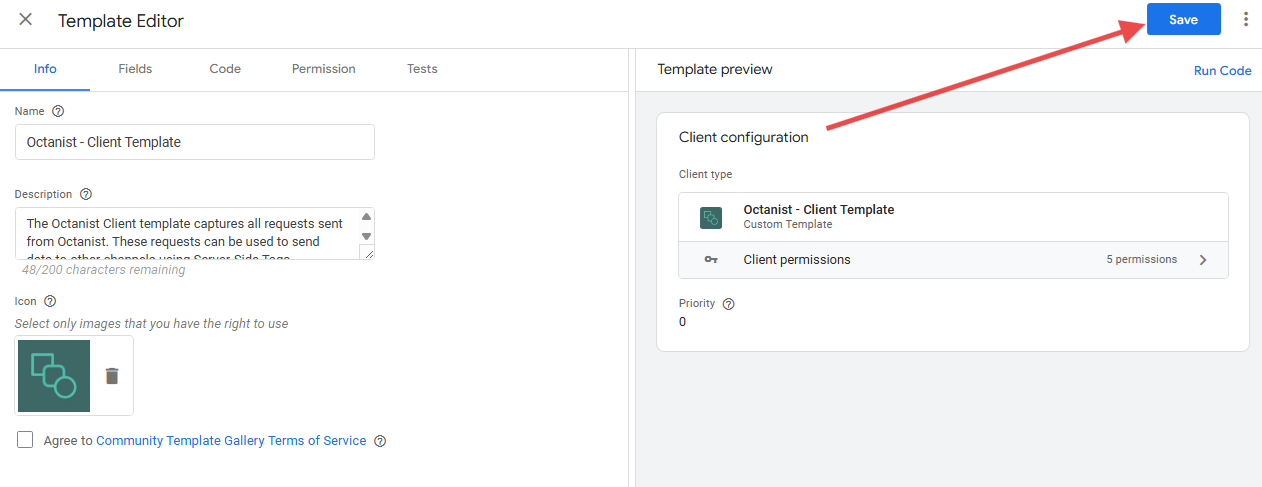
 5. After uploading, **do not make any changes**. Simply click **Save**.
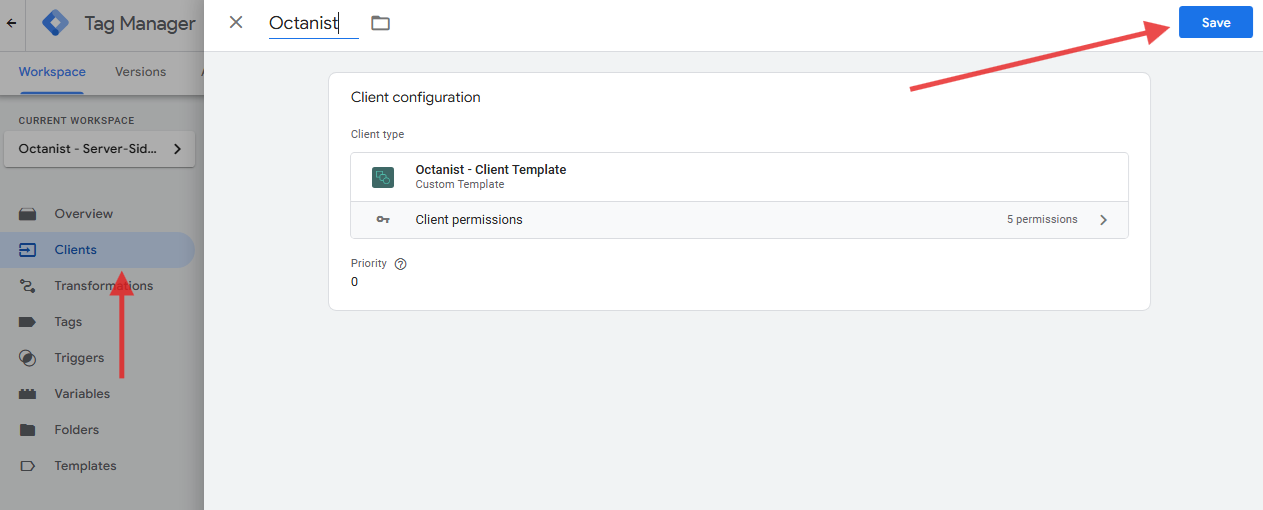
 6. Go to the **Clients** menu, click **New**, then select the **Octanist Client Template**.
7. No further configuration is needed. Click **Save**.
6. Go to the **Clients** menu, click **New**, then select the **Octanist Client Template**.
7. No further configuration is needed. Click **Save**.
 ***
## 4. Sending Data via sGTM
Once your client is set up, Octanist will begin sending qualified leads to the `/octanist` path. The Octanist Client will pick up these requests.
From here, you can route the data to any supported platform using your Server-Side Google Tag Manager container.
***
## 5. Example: Integration with Piwik Pro
Piwik Pro is a popular alternative to Google Analytics 4 and can run in parallel. This example demonstrates how to use the Octanist sGTM integration with Piwik Pro — though similar steps can be followed for other platforms such as Adform, Mailchimp, or Awin.
Most platforms require a **Match Key** to associate Octanist leads with
previous sessions. For example, if you are using a `User ID` or `Client ID` in
GA4, Piwik Pro, or Adform, you must map the same ID in your payload to
maintain attribution.
### Steps
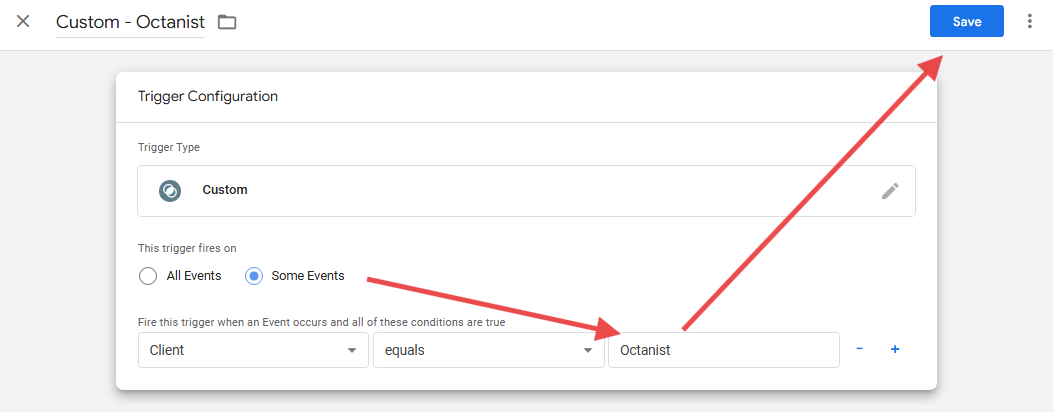
1. In your server container, create a new **Trigger**.
* Choose **Custom Trigger**.
* Set **Client Name Equals Octanist**.
* Save the trigger.
***
## 4. Sending Data via sGTM
Once your client is set up, Octanist will begin sending qualified leads to the `/octanist` path. The Octanist Client will pick up these requests.
From here, you can route the data to any supported platform using your Server-Side Google Tag Manager container.
***
## 5. Example: Integration with Piwik Pro
Piwik Pro is a popular alternative to Google Analytics 4 and can run in parallel. This example demonstrates how to use the Octanist sGTM integration with Piwik Pro — though similar steps can be followed for other platforms such as Adform, Mailchimp, or Awin.
Most platforms require a **Match Key** to associate Octanist leads with
previous sessions. For example, if you are using a `User ID` or `Client ID` in
GA4, Piwik Pro, or Adform, you must map the same ID in your payload to
maintain attribution.
### Steps
1. In your server container, create a new **Trigger**.
* Choose **Custom Trigger**.
* Set **Client Name Equals Octanist**.
* Save the trigger.
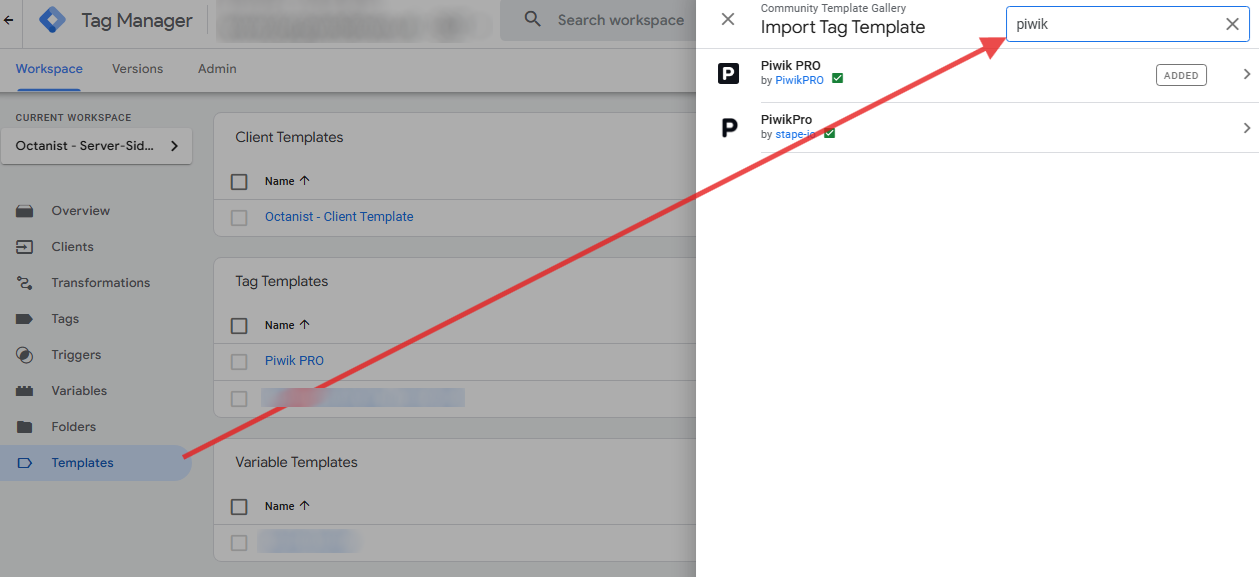
 2. Go to **Templates > Tag Templates > Search Gallery**.
* Search for and select the official **Piwik Pro** template.
2. Go to **Templates > Tag Templates > Search Gallery**.
* Search for and select the official **Piwik Pro** template.
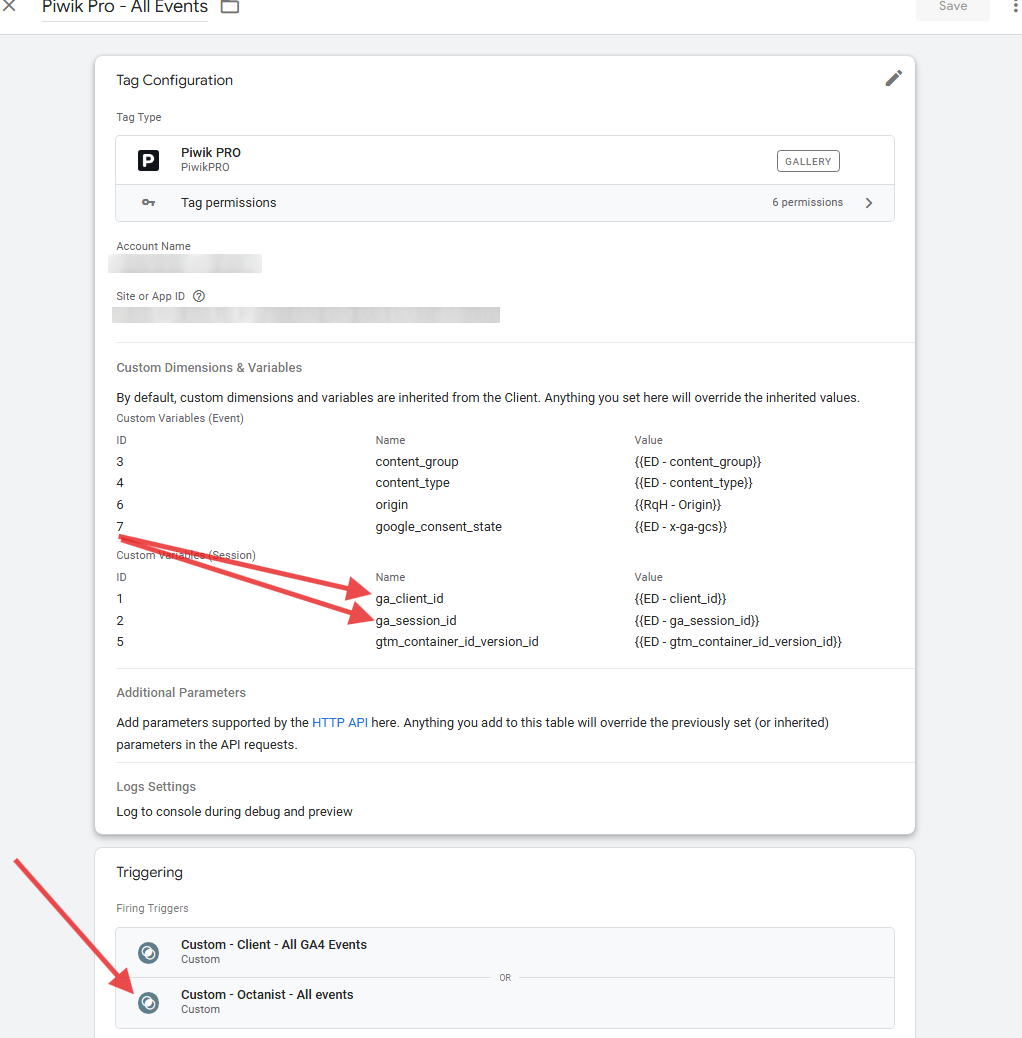
 3. Create a new **Piwik Pro Tag** using the template.
* Fill in the appropriate **Custom Variables** (e.g., Session ID, Client ID).
* Add the **Octanist Trigger** to fire this tag.
> 📘 For a complete setup, refer to [Simo Ahava's guide on server-side tagging with Piwik Pro](https://www.simoahava.com/analytics/ga4-to-piwik-pro-using-server-side-google-tag-manager/).
3. Create a new **Piwik Pro Tag** using the template.
* Fill in the appropriate **Custom Variables** (e.g., Session ID, Client ID).
* Add the **Octanist Trigger** to fire this tag.
> 📘 For a complete setup, refer to [Simo Ahava's guide on server-side tagging with Piwik Pro](https://www.simoahava.com/analytics/ga4-to-piwik-pro-using-server-side-google-tag-manager/).
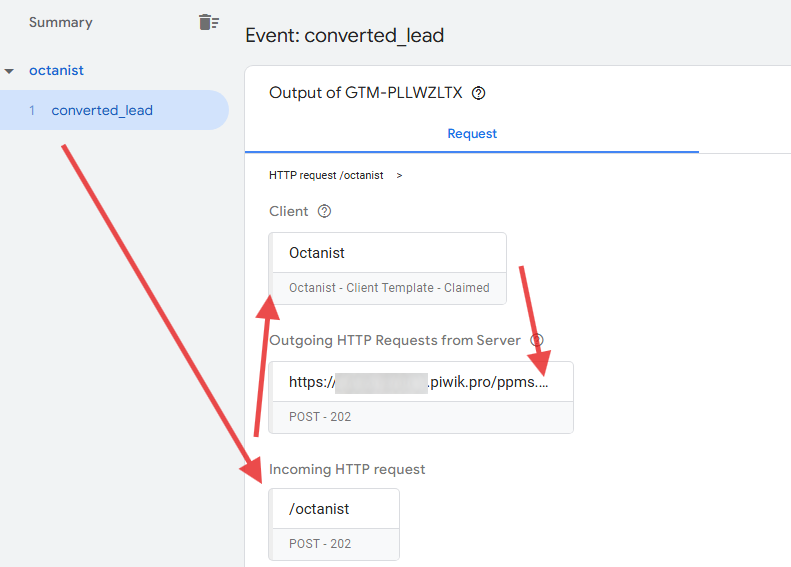
 4. Open your **sGTM Debugger** and qualify a lead in Octanist (e.g., mark as Won or Lost and include a value).
You should see a `converted_lead` event appear as an incoming HTTP request to `/octanist`, which is then processed by the Octanist Client and forwarded to Piwik Pro.
4. Open your **sGTM Debugger** and qualify a lead in Octanist (e.g., mark as Won or Lost and include a value).
You should see a `converted_lead` event appear as an incoming HTTP request to `/octanist`, which is then processed by the Octanist Client and forwarded to Piwik Pro.
 ***
You have now successfully sent Octanist leads to Piwik Pro! As a reminder, this is just one example — you can adapt this process for any tag template supported by your Server-Side Google Tag Manager container.
***
You have now successfully sent Octanist leads to Piwik Pro! As a reminder, this is just one example — you can adapt this process for any tag template supported by your Server-Side Google Tag Manager container.