> ## Documentation Index
> Fetch the complete documentation index at: https://octanist.com/docs/llms.txt
> Use this file to discover all available pages before exploring further.
# Odoo CRM
> Connect Odoo CRM to Octanist to update leads when opportunities move through your Odoo pipeline.
The Odoo CRM integration updates leads in Octanist when an opportunity changes in Odoo. Octanist can mark leads as qualified, won, or lost, and can use Odoo expected revenue as the lead value.
Odoo sends the pipeline stage as a numeric `stage_id`. You will need to copy
the Odoo stage IDs for the stages you want to map.
## Table of Contents
1. [Create the Integration in Octanist](#1-create-the-integration-in-octanist)
2. [Enable Developer Mode in Odoo](#2-enable-developer-mode-in-odoo)
3. [Find Your Odoo Stage IDs](#3-find-your-odoo-stage-ids)
4. [Create the Odoo Automation Rule](#4-create-the-odoo-automation-rule)
5. [Complete the Setup in Octanist](#5-complete-the-setup-in-octanist)
6. [Test the Integration](#6-test-the-integration)
***
## 1. Create the Integration in Octanist
1. Go to [Octanist](https://octanist.com/) and navigate to **Integrations > Updating > Add New**.
2. Choose **Odoo CRM**.
3. Copy the **Webhook URL** from the first setup step.
Use the full webhook URL from Octanist. The URL includes a secret at the end
and must be pasted exactly into Odoo.
***
## 2. Enable Developer Mode in Odoo
1. Log in to Odoo.
2. Open **CRM**.
3. Go to **Configuration > Settings**.
4. In the left sidebar, click **General Settings**.
5. Scroll to **Developer Tools** and click **Activate the developer mode**.
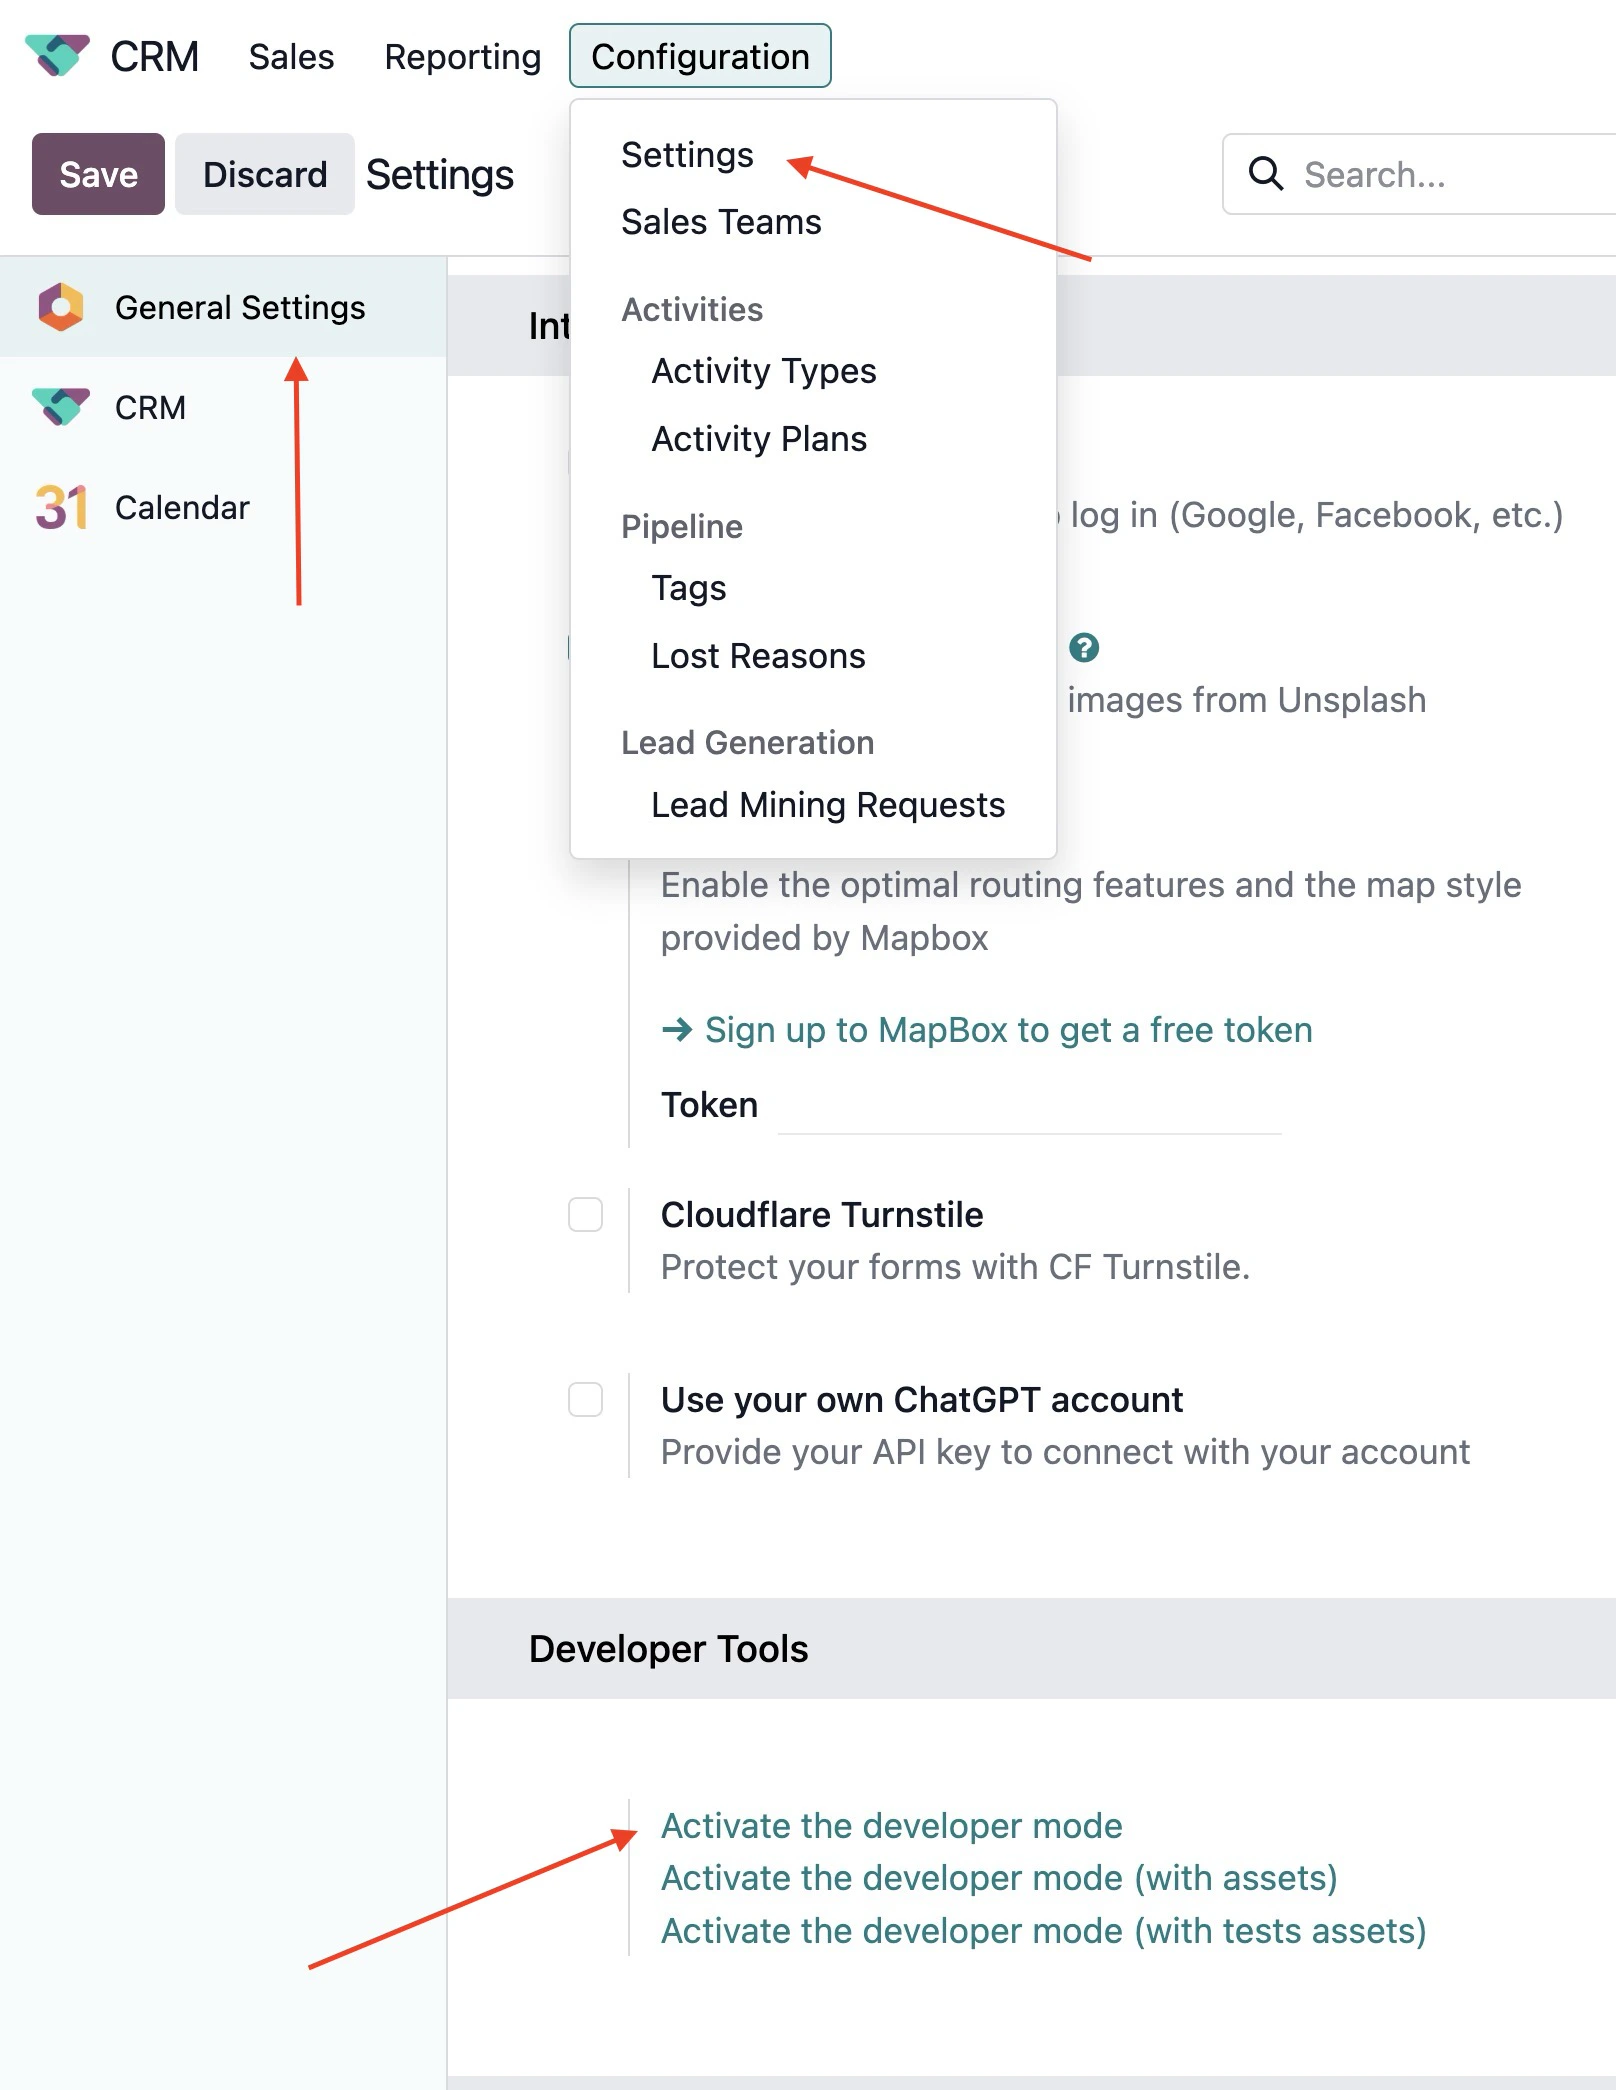 After developer mode is active, return to CRM.
***
## 3. Find Your Odoo Stage IDs
Octanist maps Odoo `stage_id` values to lead statuses. You need the stage ID for:
* The stage that should mark a lead as **Qualified**
* The stage that should mark a lead as **Won**
* Optional: the stage that should mark a lead as **Lost**
A lost stage is optional. When an Odoo opportunity is marked as lost, Odoo
sends `active: false`, and Octanist can use that to mark the lead as lost.
1. In Odoo CRM, go to **Configuration > Stages**.
After developer mode is active, return to CRM.
***
## 3. Find Your Odoo Stage IDs
Octanist maps Odoo `stage_id` values to lead statuses. You need the stage ID for:
* The stage that should mark a lead as **Qualified**
* The stage that should mark a lead as **Won**
* Optional: the stage that should mark a lead as **Lost**
A lost stage is optional. When an Odoo opportunity is marked as lost, Odoo
sends `active: false`, and Octanist can use that to mark the lead as lost.
1. In Odoo CRM, go to **Configuration > Stages**.
 2. Open the stage you want to map.
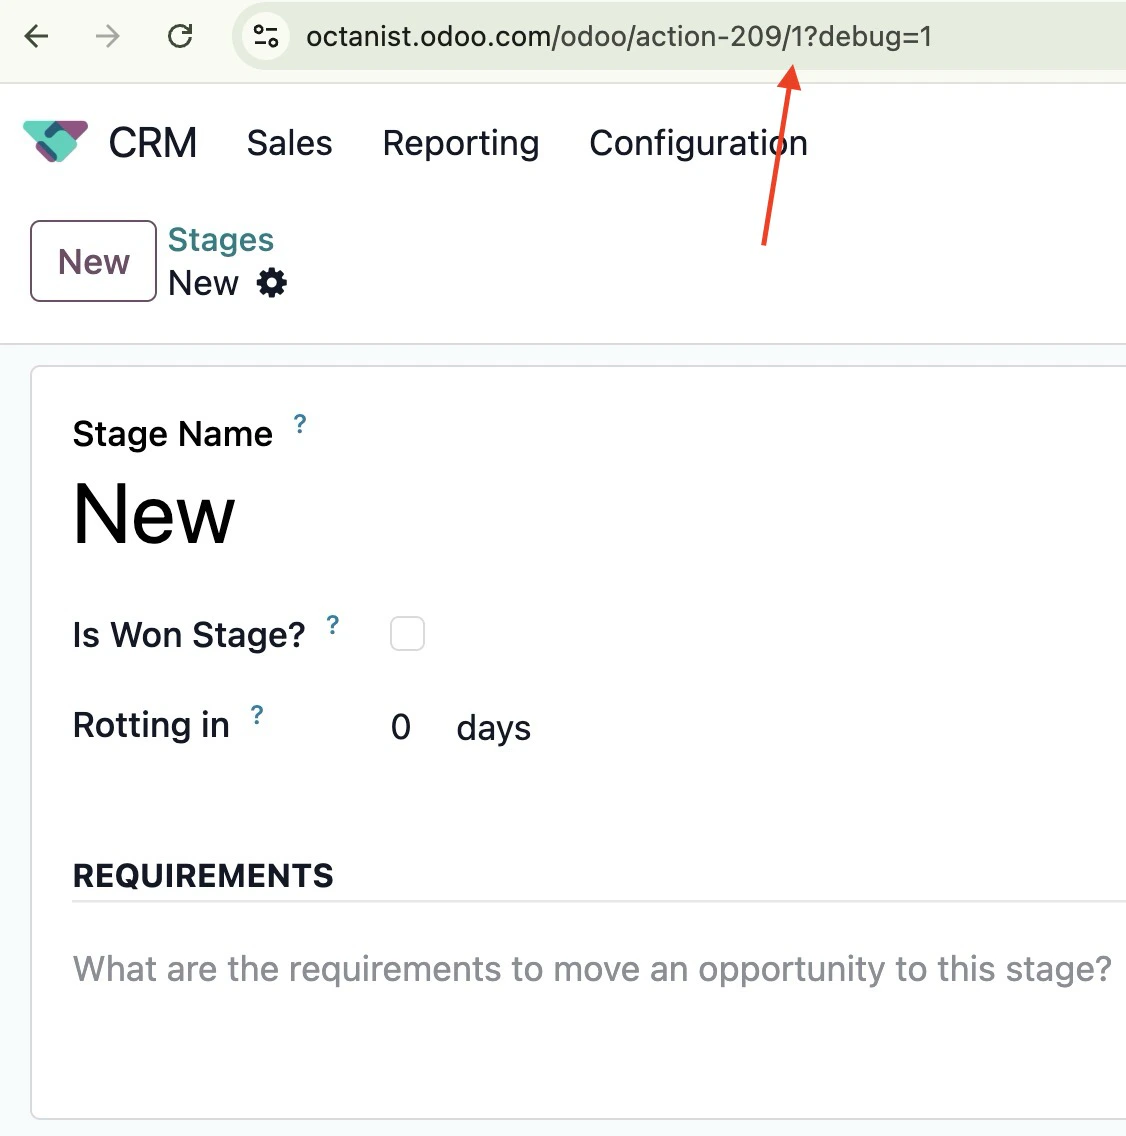
3. Look at the URL in your browser.
4. Copy the stage record ID from the URL.
For example, if the URL contains:
```text theme={null}
/odoo/action-209/1?debug=1
```
The stage ID is:
```text theme={null}
1
```
Do not use the `action-209` number. Use the record ID after it, right before
`?debug=1`.
2. Open the stage you want to map.
3. Look at the URL in your browser.
4. Copy the stage record ID from the URL.
For example, if the URL contains:
```text theme={null}
/odoo/action-209/1?debug=1
```
The stage ID is:
```text theme={null}
1
```
Do not use the `action-209` number. Use the record ID after it, right before
`?debug=1`.
 Repeat this for your qualified and won stages.
***
## 4. Create the Odoo Automation Rule
1. In Odoo CRM, click the **Studio** button in the top bar.
Repeat this for your qualified and won stages.
***
## 4. Create the Odoo Automation Rule
1. In Odoo CRM, click the **Studio** button in the top bar.
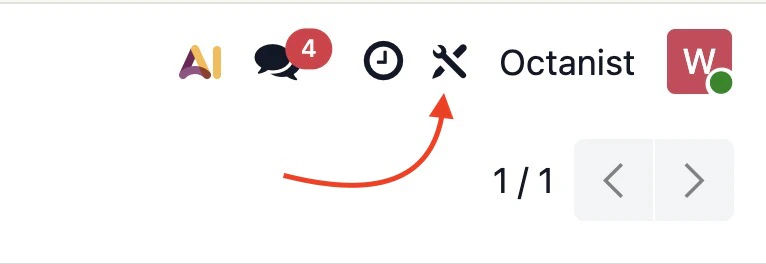 2. In Odoo Studio, open the **Automations** tab.
 3. Click **New**.
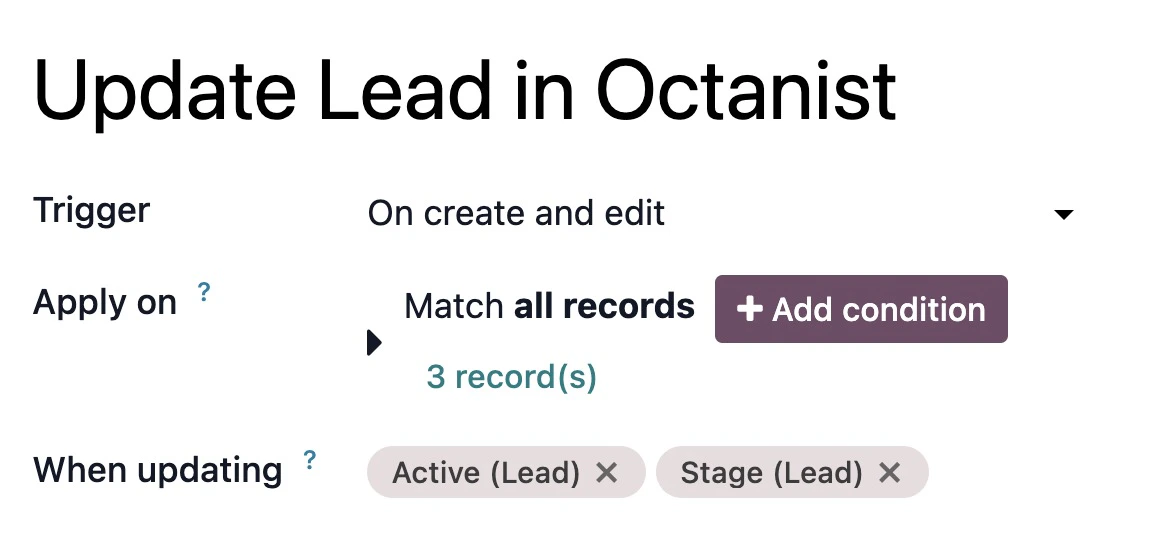
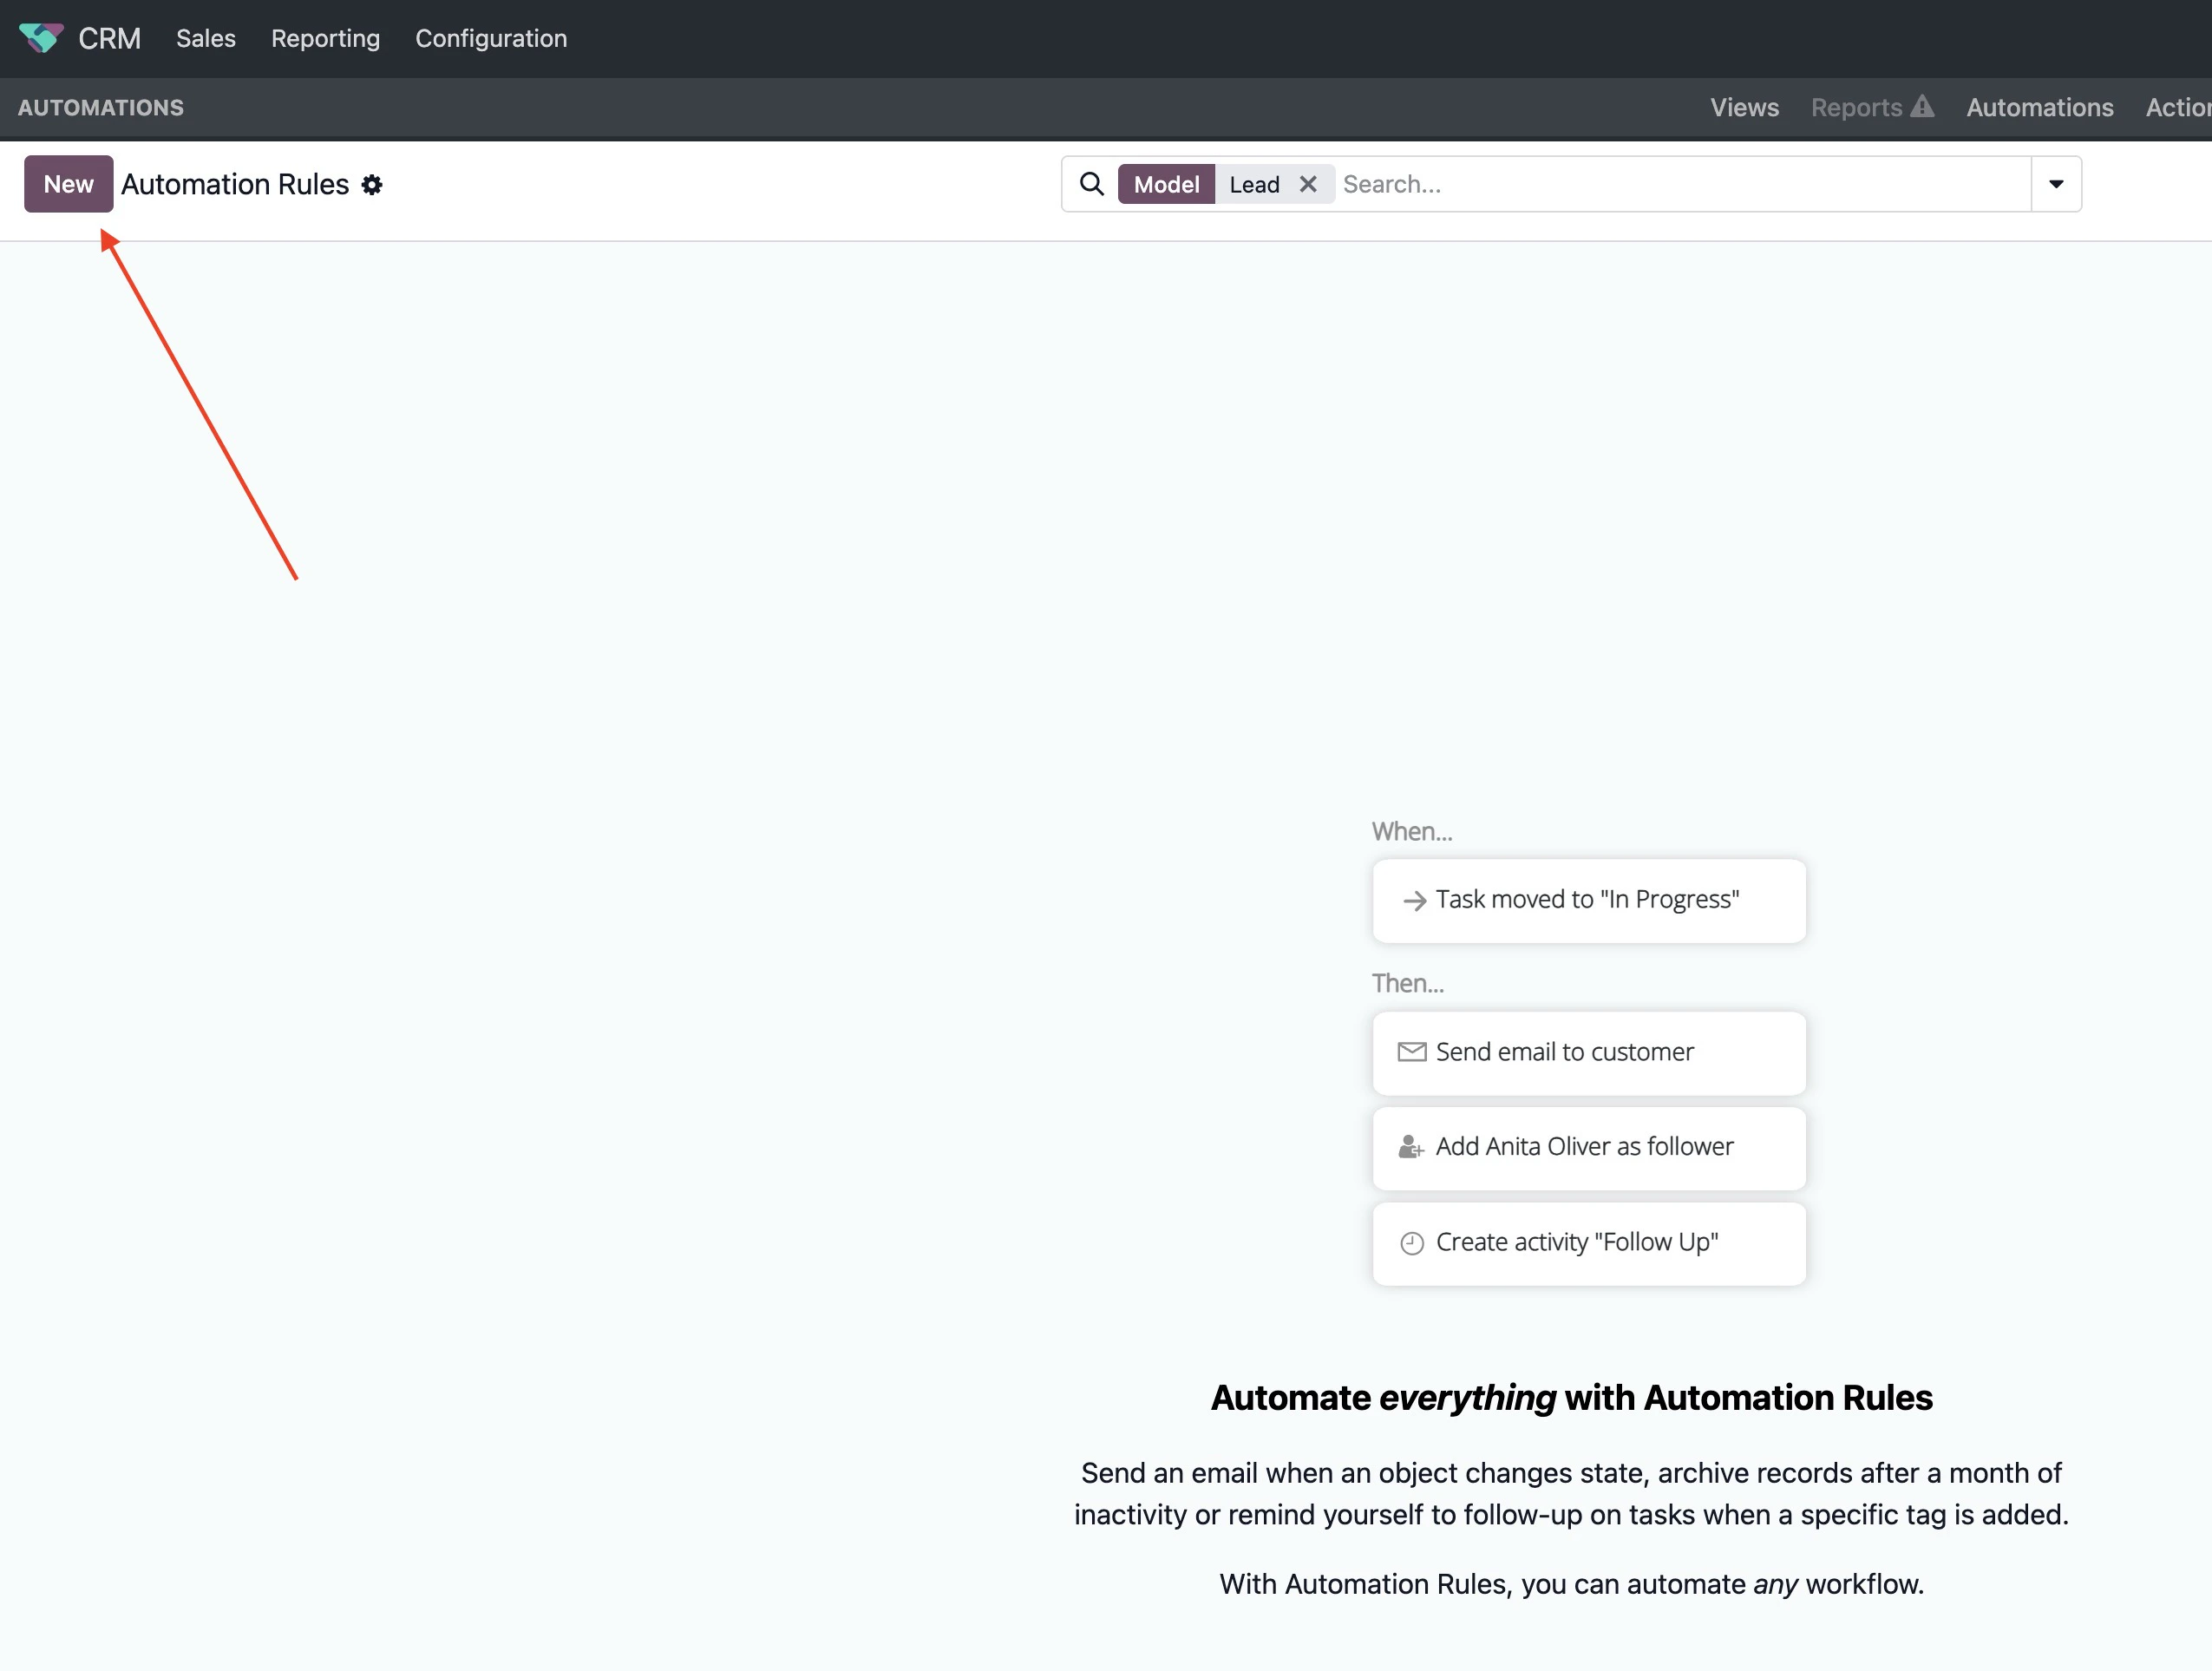 4. Configure the automation rule:
* **Name**: `Update Lead in Octanist`
* **Trigger**: `On create and edit`
* **Apply on**: `Match all records`
* **When updating**: add `Active (Lead)` and `Stage (Lead)`
4. Configure the automation rule:
* **Name**: `Update Lead in Octanist`
* **Trigger**: `On create and edit`
* **Apply on**: `Match all records`
* **When updating**: add `Active (Lead)` and `Stage (Lead)`
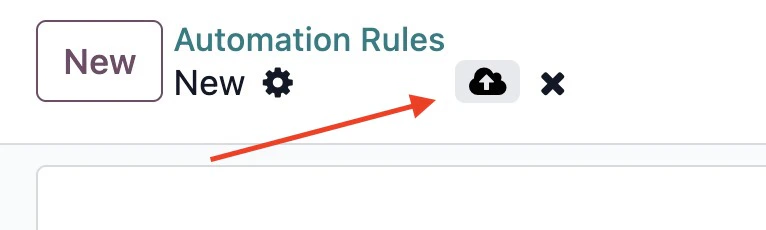
 Do not save the automation rule yet. Add the webhook action first.
5. Add an action and choose **Send Webhook Notification**.
Do not save the automation rule yet. Add the webhook action first.
5. Add an action and choose **Send Webhook Notification**.
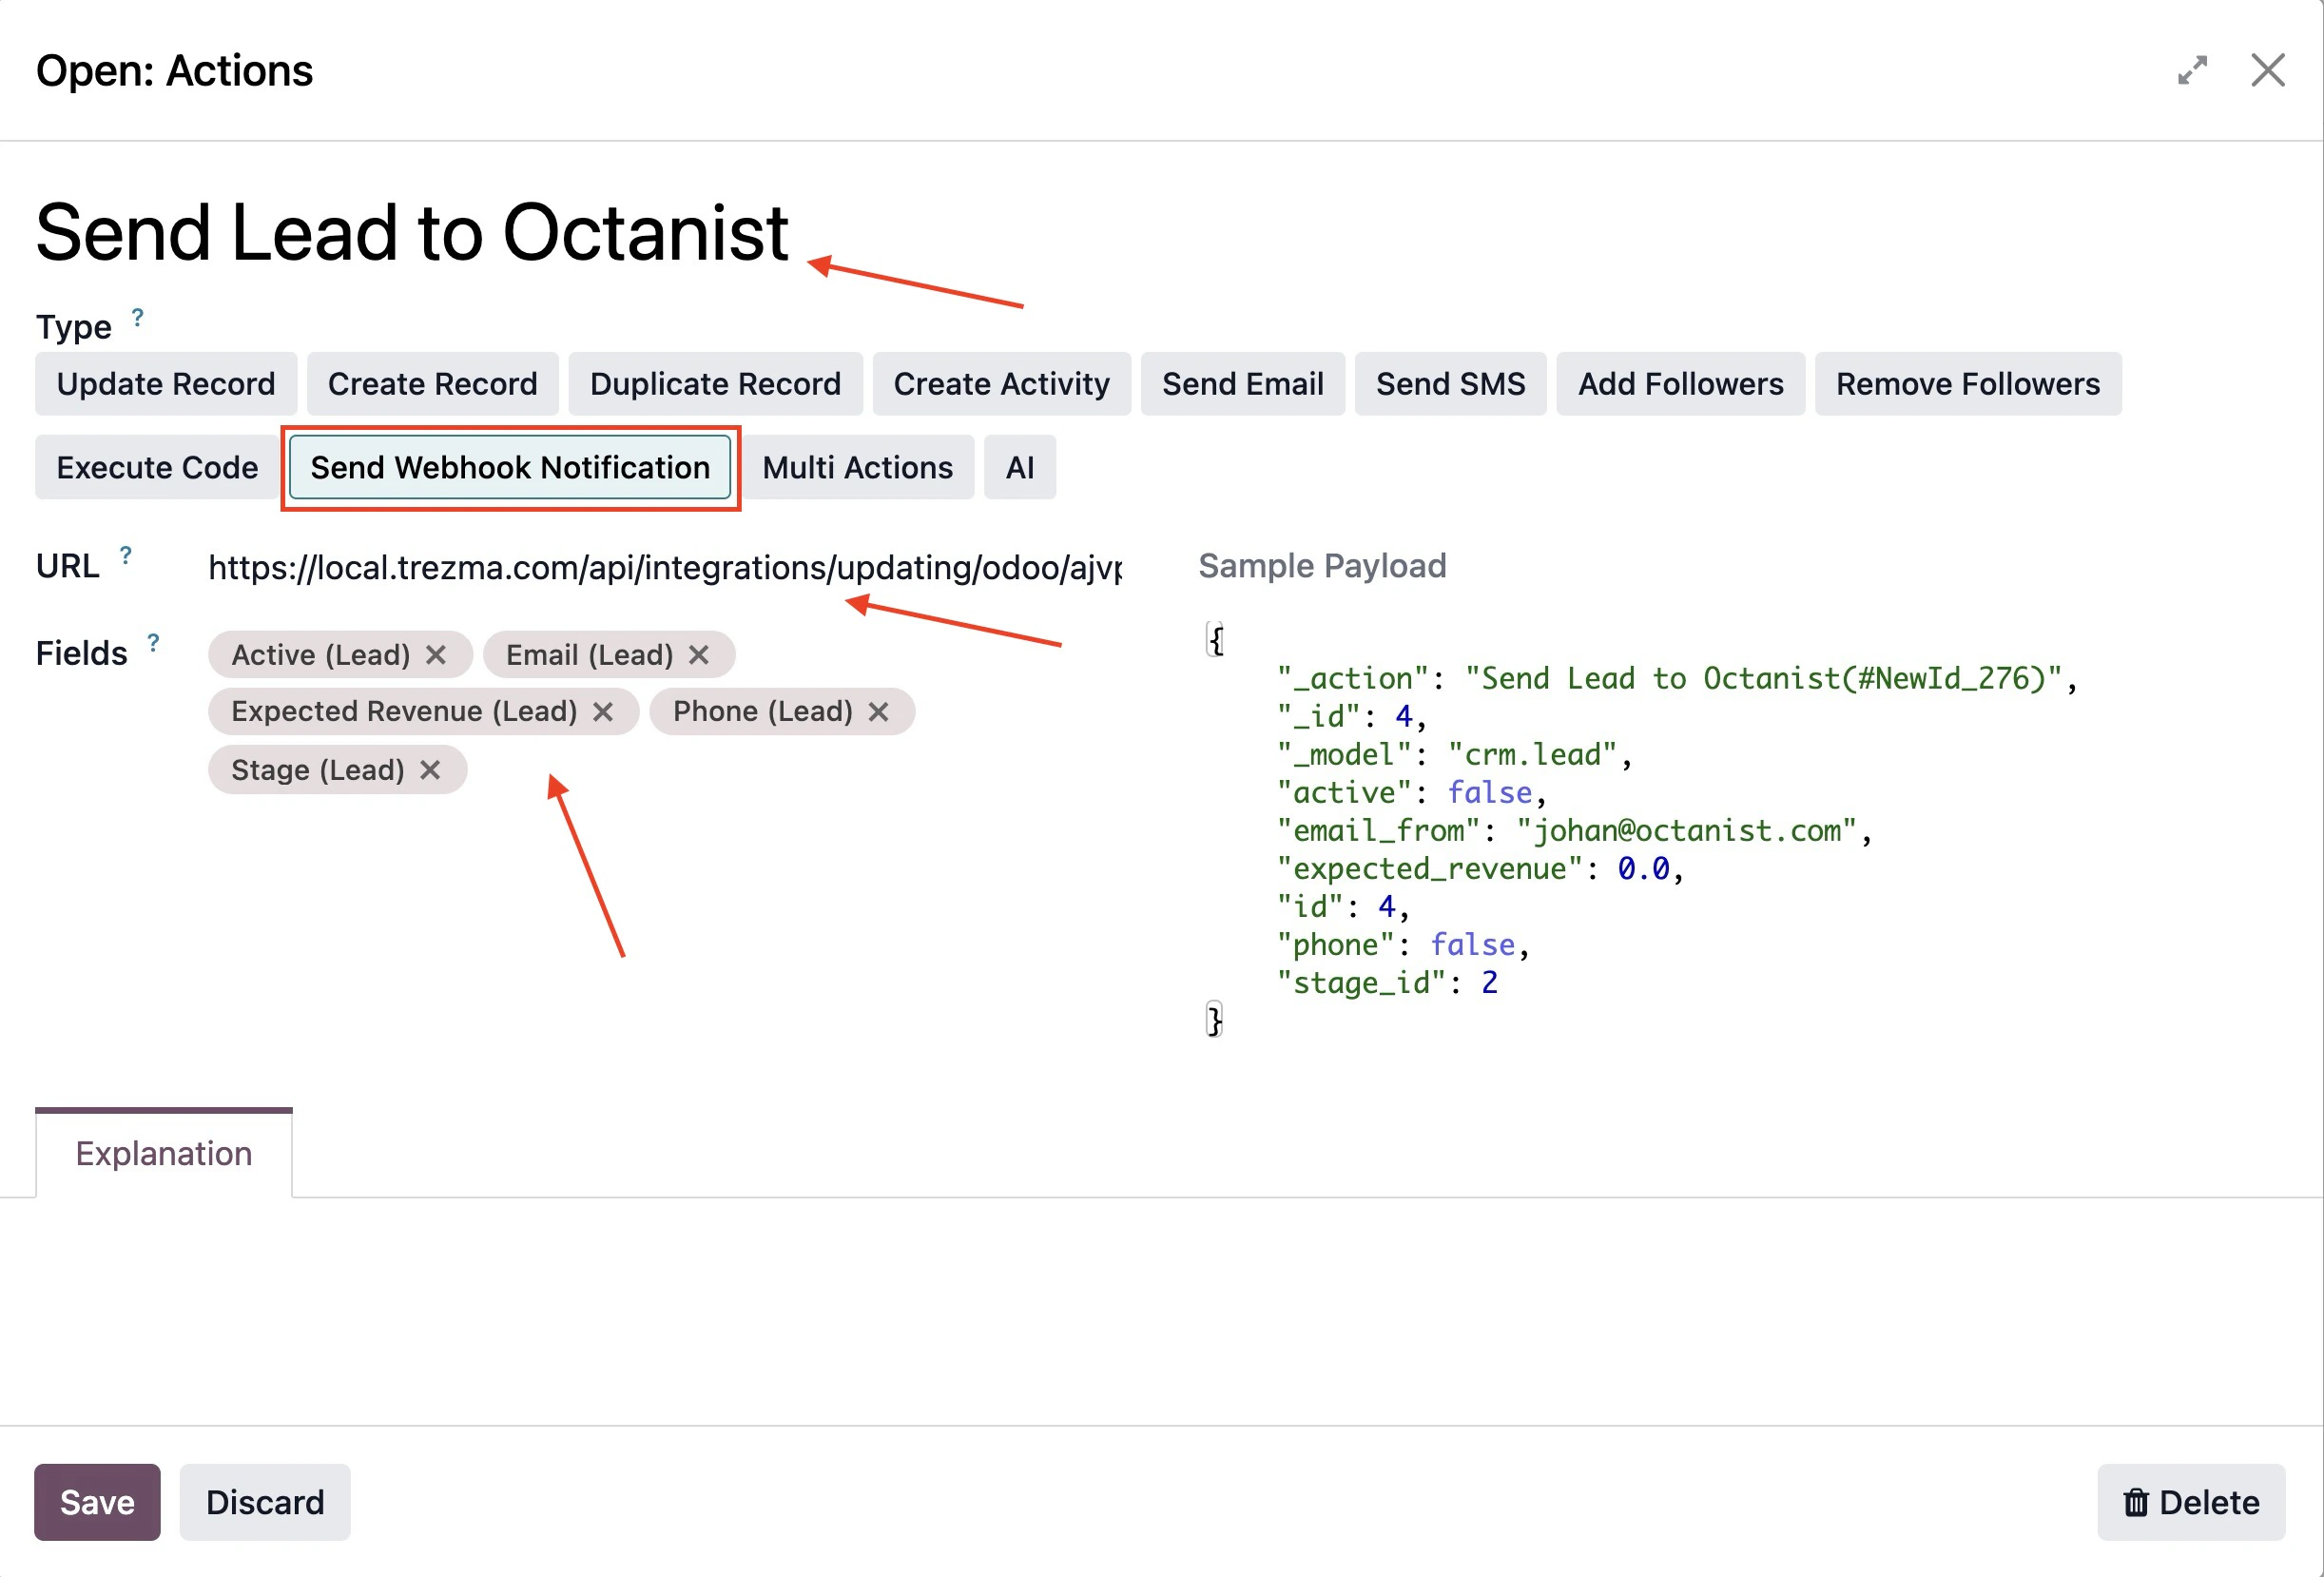
 6. Configure the webhook action:
* **Name**: `Send Lead to Octanist`
* **Type**: `Send Webhook Notification`
* **URL**: paste the full webhook URL from Octanist
* **Fields**:
* `Active (Lead)`
* `Email (Lead)`
* `Expected Revenue (Lead)`
* `Phone (Lead)`
* `Stage (Lead)`
6. Configure the webhook action:
* **Name**: `Send Lead to Octanist`
* **Type**: `Send Webhook Notification`
* **URL**: paste the full webhook URL from Octanist
* **Fields**:
* `Active (Lead)`
* `Email (Lead)`
* `Expected Revenue (Lead)`
* `Phone (Lead)`
* `Stage (Lead)`
 7. Click **Save**.
***
## 5. Complete the Setup in Octanist
Return to the Odoo setup flow in Octanist.
1. Paste the Odoo stage IDs:
* **Qualified Stage ID**
* **Won Stage ID**
* Optional: **Lost Stage ID**
2. Set fallback values:
* **Qualified Lead Value**
* **Won Lead Value**
3. Give the integration a clear name.
4. Complete the setup.
If Odoo sends expected revenue as `0`, `null`, or does not send it at all,
Octanist uses the fallback value you configured.
***
## 6. Test the Integration
Create or update a test opportunity in Odoo.
1. Move the opportunity to the stage mapped as **Qualified**.
2. Move the opportunity to the stage mapped as **Won**.
3. Mark the opportunity as **Lost** in Odoo.
Then check **Octanist > Activity History**.
You should see:
* `Odoo webhook received`
* `Lead updated via odoo`
* Or a skipped activity explaining why the update was not applied
If you do not see `Odoo webhook received`, the request did not reach Octanist.
Check the webhook URL, Odoo automation rule, tunnel configuration, and allowed
hosts.
If you have any questions about this setup, contact us at [support@octanist.com](mailto:support@octanist.com).
7. Click **Save**.
***
## 5. Complete the Setup in Octanist
Return to the Odoo setup flow in Octanist.
1. Paste the Odoo stage IDs:
* **Qualified Stage ID**
* **Won Stage ID**
* Optional: **Lost Stage ID**
2. Set fallback values:
* **Qualified Lead Value**
* **Won Lead Value**
3. Give the integration a clear name.
4. Complete the setup.
If Odoo sends expected revenue as `0`, `null`, or does not send it at all,
Octanist uses the fallback value you configured.
***
## 6. Test the Integration
Create or update a test opportunity in Odoo.
1. Move the opportunity to the stage mapped as **Qualified**.
2. Move the opportunity to the stage mapped as **Won**.
3. Mark the opportunity as **Lost** in Odoo.
Then check **Octanist > Activity History**.
You should see:
* `Odoo webhook received`
* `Lead updated via odoo`
* Or a skipped activity explaining why the update was not applied
If you do not see `Odoo webhook received`, the request did not reach Octanist.
Check the webhook URL, Odoo automation rule, tunnel configuration, and allowed
hosts.
If you have any questions about this setup, contact us at [support@octanist.com](mailto:support@octanist.com).